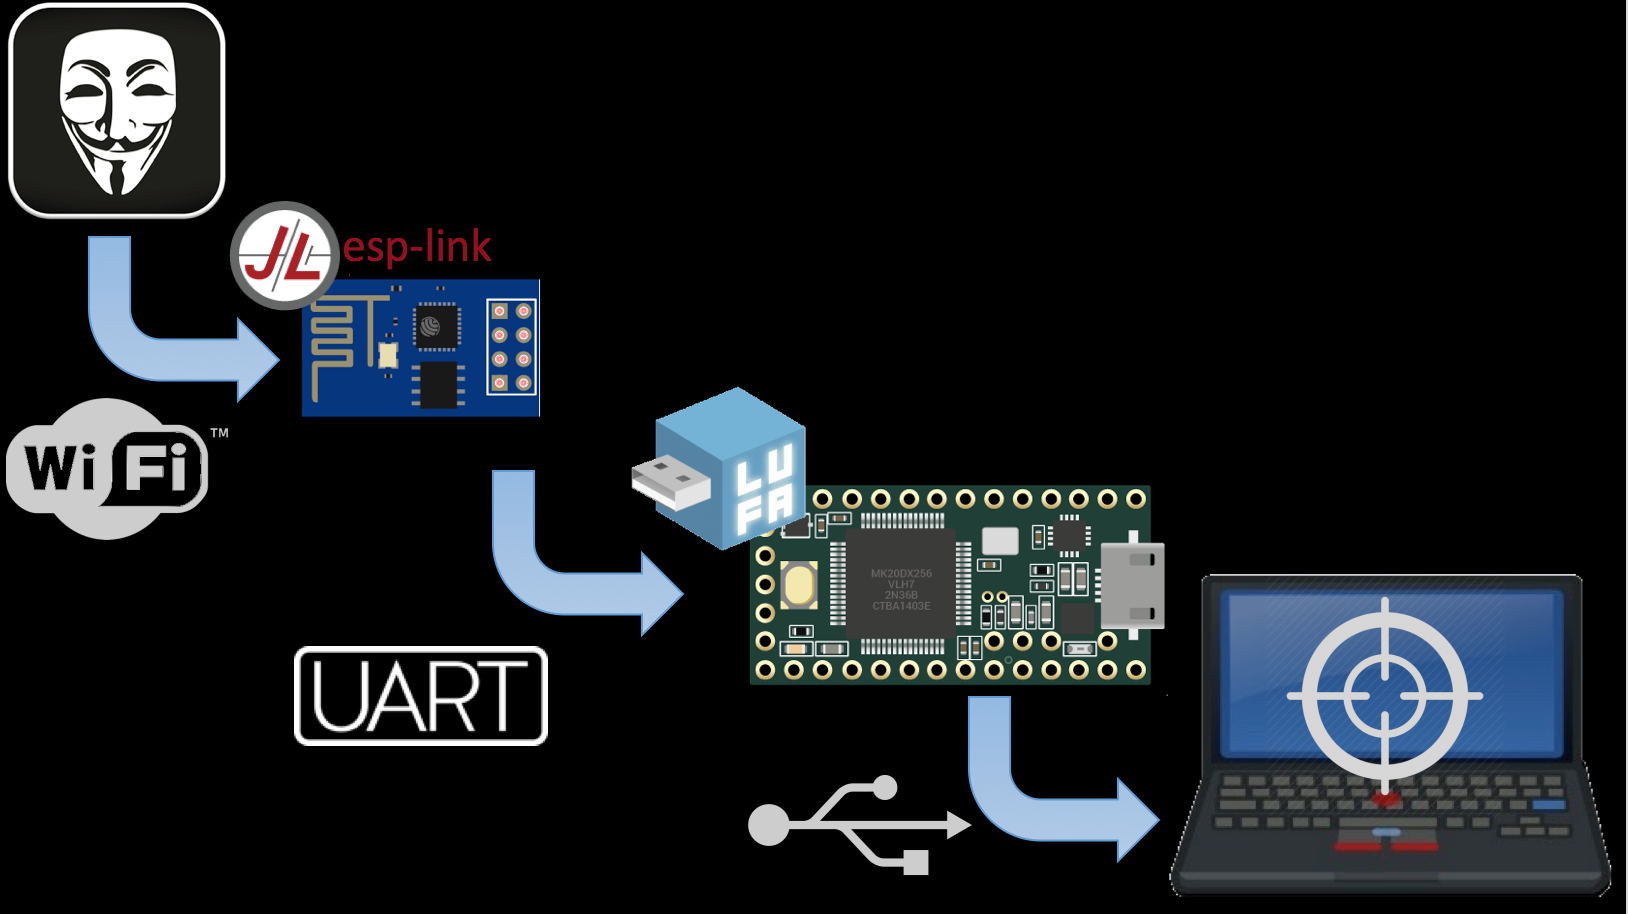
Typically most people use whatever the canonical file read suggestion for their language is, until they need to read large files and it’s too slow. Then they google “efficiently reading large files in
However, in Halvar’s recent QCon talk he had several slides talking about how most code is written based on the old assumptions of spinning disks. With non-SSD HD’s there’s usually a single read head and you can’t do much in parallel. This requires code to optimise for single reads, minimal seeks, and large redhead of data layed out on disk next to each other. But modern SSDs are much more comfortable with seeks and parallelism.
So I wanted to test it. To do this I wrote five simple rust programs that read data from a large file. To keep it simple, I didn’t do any line reading - just read as much as you can as fast as you can.
The code for each of these is available here.
Vanilla is the simplest and based on what you get when you google “reading a file in rust” which points you to [this chapter] in the rust handbook.
It tries to read the whole file, and convert it into a single String in memory.
IO read dispenses with the String conversion and does the same as vanilla but with a raw read into a single byte buffer.
Both (1) and (2) will fail if the file you’re trying to read can’t fit into memory.
Block read is a modification of (2) to read the file in 8M blocks instead of trying to read the whole file into memory.
The 8M block size is based on some simple tests I did on my machine.
If you google “efficiently reading large files in rust” you’ll likely hit an article pointing you to BufReader. The most common use case is to read lines. Instead this is a slight modification to do block reads instead and keep it consistent with the other approaches.
Finally, this is a threaded version of (3) where each thread simultaneously opens its own file handle, seeks to its offset and reads a part of the file.
This used to be a “bad idea” - multiple concurrent seeks, and concurrent reads would be slow on spinning disks.
I’m quite simply measuring total execution time of each version when reading a 5G file. I do this using the fantastic hyperfine tool.
I run each test three times to warm up caches, then I do five measured runs. The tests were run on my 2021 MBP with an M1 chip.
Hyperfine gives the mean of the five runs with standard deviation, as well as a min and max. Finally it gives some stats comparing each run.
Here are the results of the run. As you can see the vanilla approach is horribly slow. Over 12x slower than the best approach. The IO reader is slightly faster, but not much, because it isn’t needing to mess with String allocations/conversions. There’s a significant speedup reading blocks, and the buffered reader can do this for you and is even very slightly faster than doing it manually. However, when we switch to concurrent reads, we get a significant speed up - nearly 3x faster than the buffered reader.
In short, Halvar was right, which isn’t a very controversial statement. However, I was genuinely surprised to see how big a difference it made, and that there’s little to no discussion on the topic. I hope this helps someone somewhere.
]]>If you’re only interested in the results, here it is, under a variety of scenarios against hashcat, and you’ll see it ranges from waaay faster to much faster than hashcat. You can get the code at https://github.com/sensepost/ntcrack/.
Click for the bigger image. (If you’re wondering why there’s no hashcat run for the full rockyou hashes as input, it’s because it takes about 10m with hashcat.)
I optimised for total running time, and got some good gains against hashcat by a faster startup. But even if we look at raw hashes generated per second, when cracking the 143 test hashes against the 1G sized insidepro wordlist, hashcat gets 26 205 kH/s while ntcrack gets 40 207 kH/s.
In this post, I’ll go through what I did that worked, and didn’t work to get this result.
The first response to this sort of work and comparison always seems to be to suggest shifting the goalposts to a different comparison, oft times driven by a belief this is some sort of fight, so let me get all the caveats out of the way.
Hashcat is amazing, not just the tool, the project and the community around it is too. In terms of total functionality, hashcat thrashes my little project into a little whimpering mess. They support a bajillion different hashes, and a bajillion different ways to crack them. For NT hashes and other fast hashes, they have a ton of rules and other manipulations that can be used. In fact, the second you throw a simple mutation to brute force an extra ASCII byte (?a) on the end of each word (-a6) in the wordlist, hashcat hits 900+ MH/s, which also thrashes the hashes per second, *and* total running time of ntcrack.
So this isn’t a “hashcat bad, me good” post.
ntcrack is a simple rust program, weighing in at around 150 lines of code. It runs multi threaded on CPU only, no GPU. It reads a list of input hashes to crack from a file, and a wordlist to check the hashes against from stdin. So you run it like this:
./ntcrack input.hashes < wordlist
It’s rough and ready right now. No error handling. Expects a wordlist with unix line breaks, you can’t specify the number of threads, and doesn’t even let you pipe the wordlist. I’ll get to that … maybe … pull requests welcome.
I’ve commented the code so you can see what I did to speed things up, but it doesn’t really give you what the alternatives are, and which I tried. In the next section I’m going to go through each of those, in roughly descending order of impact i.e. I’ll start with what made stuff go the fastest not the order I actually built it.
Multi-threading is an obvious way to speed something up. Especially for large scale brute forcing like this, we should just be able to parallelise the tasks and get an instant speed up. But it doesn’t always work like that.
The main problem with password cracking is first to write an optimised hash generator, but second to feed it from the wordlist fast enough. So if you head to threading too soon, you’ll either end up with an inefficient hash generator that threading would hide a little, or you end up constrained waiting for the data to be read from the file.
As I spent a lot of time working on getting the hashing fast first, by the time I got to threading I didn’t have that problem, but I did have the other … simple threading made stuff *slower* because the threads sat around waiting for things to be read and fed to them.
Threading in rust is hard, if you follow the “Rust by Example” guide (https://doc.rust-lang.org/rust-by-example/std_misc/channels.html) you quickly run into a protracted battle with the borrow checker. Steve Klabnik has a perfect write up of why here (https://news.ycombinator.com/item?id=24992747). Because rust’s borrow checker stops you from being a bonehead, it also makes it very hard to share data between threads (I’m not even talking write here). I tried his suggestion in the end, scoped threads, and it made things slower due to the read problem. I then tried the Rayon crate (https://docs.rs/rayon/) and it’s par_iter() which made things less slow than scoped threads but still slower than no threads. So I decided to build my own raw threading approach.
I moved all the logic for generating the hash and comparing it to a thread, and kept as little in the read_line_from_file loop as possible, to maximise read speed (i.e. read and send to the thread, then read the next line). I also used a multiple receiver single sender channel from the crossbeam crate (https://docs.rs/crossbeam/latest/crossbeam/channel/index.html) to implement a sort of queue that the threads could pick work from as fast as I could read it. I used crossbeam because the standard channel (https://doc.rust-lang.org/std/sync/mpsc/) is a multi-producer, single-consumer, which is the opposite of what I needed.
The big stumbling block was that what was read from the file went out of scope when the program ends, and the threads don’t. Rust’s compiler isn’t smart enough to spot that we wait for all the threads to exit at the end, so you have to instead stick each line in a new object for each thread, which means an expensive allocation. So instead I buffered a bunch of words into a single array (Vec) and sent a buffer to a thread to work through to both reduce the alloc()s as well as the amount of messages that needed to be sent and pickup over the channel.
Lastly, I wanted to be able to exit early if all the hashes supplied had been cracked; don’t waste time reading the rest of the file and generating hashes for them. This is why the first item in the test screenshot at the top of this post is so fast. But, each thread doesn’t know what the other threads have cracked, and introducing a shared, writable list was going to cause more blocking than it’s worth. So instead I send the number of hashes a thread has cracked back, and the main program checks if the total matches. That required some caching, as sending a message for every cracked hash introduced a significant slowdown on large input hash lists. So instead I buffer and send them through in chunks.
You would have seen multiple references to file read speed above. That’s because with a fast hash like an NT hash, you’re likely to get large wordlists thrown at the input hashes (and less likely to get large input hash lists), so the thing that needs to be optimised the most is the file read speed.
For this I tried numerous options. The first was a vanilla lines() iterator which is what the “Rust by Example” documentation suggests (https://doc.rust-lang.org/stable/rust-by-example/std_misc/file/read_lines.html). This is very slow, primarily because it allocates a new String for each line, or so my bad reading of perf data tells me.
I then tried a few different versions of implementing my own line reader, all of which worked out either slower or only marginally faster. Until I was pointed to ripline (https://twitter.com/killchain/status/1482770333958553603) and (https://github.com/sstadick/ripline). Ripline takes its implementation from ripgrep, and has a few different ways of reading from a file. The one I was most interested in was it’s use of the mmap() (https://www.man7.org/linux/man-pages/man2/mmap.2.html) call, which in their benchmarking was the fastest way to read from a file and still get it line by line.
I of course tried several variations, including my own mmap reader, using mmap with other line readers etc. but ripline gave me the fastest iterator over a mmap’ed file. I also noticed that it was marginally faster getting the file from stdin rather than a filename. But ripline + mmap2 worked the best. The only downside is that it breaks DTrace profiling (https://gist.github.com/singe/70010e2f48a7ad8fdcbab177eeb9b18a).You’d think the most expensive part of cracking a single hash would be generating the candidate hash, but it’s not, it’s finding if the candidate hash you generated is in the list of input hashes you provided. If you only provide one input hash, then it isn’t a problem, but if you provide thousands or hundreds of thousands, you have to look up every candidate hash generated against this list. To take it a bit further, if you have 10 input hashes, the average linear search through that list will find a hash in 5 attempts. So if you have a wordlist with 100 hashes, now you’re doing 100*5 =500 lookups. But, given that the majority of hashes you generate *won’t* be in your input list, the performance is actually much worse.
My first attempt was to use some sort of balanced tree. Rust has some built in BTree functionality (https://doc.rust-lang.org/std/collections/struct.BTreeMap.html) and I used that (BTreeSet). This gave a bit of a speedup for larger input hash lists. However, it wasn’t what I hoped. I experimented with removing items from the set to speed up future lookups and allow an early exit if we cracked everything, but it still wasn’t what I hoped.
Then a friend pointed out I could just use a hash table (https://doc.rust-lang.org/std/collections/hash_map/struct.HashMap.html) because it gives a constant O(1) cost for each lookup, rather than a BTree’s O(log(n)). That worked well and gave a bit of a speed up.
But what really made the impact, was to switch the HashMap’s hasher function to the NoHashHasher (https://docs.rs/nohash-hasher/0.2.0/nohash_hasher/index.html), a hasher specifically designed for already hashed data, which a list of NT hashes is! With that in place, I got a great combined speed boost when looking up whether a hash generated from a word in the wordlist matched any of the input hashes provided.
Finally, I did one more thing. If only a single input hash is provided, it’s faster to check if a candidate hash starts with the same bytes as the hash we’re looking for, rather than comparing all 16 bytes of the two hashes. If they don’t match we can move on and save the slightly more expensive HashMap lookup. And if they do, it’s a very small extra price to pay. But this has the added advantage, that for small input hash lists, we can reduce the total HashMap lookups we do to the number of unique first bytes. Given there are a total of 256 possible byte values, for input hash lists much larger than that it doesn’t start to make sense. The small number of all possible single bytes means we can store the byte in an array of 256 items, and do a very fast lookup by using the byte as the index. e.g. if the hash starts with ‘AA’ then our boolean array[170] (170 is the decimal of the hex AA) can be set to true.
Finally, we want to make sure the actual hash computation is efficient. A NT hash has two operations, encoding the text in UTF16LE then MD4 hashing the result. The latter part turned out to be pretty easy. The Rust Crypto team (https://github.com/RustCrypto) has done a great job in building performant algorithms in rust and MD4 is no exception (https://docs.rs/md4/latest/md4/). One small tweak was to do the digest in one call, rather than an update and then finalise call as per their docs.
What took longer to get right, and I didn’t see coming, was the UTF16 encoding. At its most simple, UTF16 will just widen an ASCII character to two bytes instead of one by adding a NULL byte. The “LE” stands for little endian, which will place the NULL before the ASCII byte. So an ASCII “A” is 0x41 and a UTF16LE encoded “A” is 0x0041. What hashcat does (did? https://github.com/hashcat/hashcat/commit/045701683430ce0c0a0c1545a637edf7b659a8f3) for speed and to avoid complexity in the GPU code, is to just stuff that NULL byte in, and assume it’s always an ASCII charset in use. I initially tried the same but ran into two problems. The first was that it required alloc()ing a whole new Vec for each candidate we encode, which becomes expensive. This was resolved by doing it per char in a map instead and reusing the resulting Vec. The more pernicious problem is that most wordlists don’t only have ASCII characters and doing proper encoding matters if you deal with non-English hashes.
Rust forces you to be explicit about Strings by enforcing a UTF8 requirement for a String. That’s fine if your input file is guaranteed to be UTF8 encoded, but wordlists are often a mixed bag, and might not be universally encoded. So it makes more sense to read bytes from the file, and not assume you’re reading UTF8. That means that to do “proper” UTF16 encoding you need to first convert the raw bytes to UTF8. After that Rust has native UTF16 encoding (https://doc.rust-lang.org/std/primitive.char.html#method.encode_utf16) which can be converted to little endian bytes natively too (https://doc.rust-lang.org/std/primitive.u16.html#method.to_le_bytes). This works, and is ok speed wise. But, in the end going unsafe() and using align_to() worked much faster. At least half the speed up I suspect is from using unsafe() and dropping some of the checks that brings.
This almost always catches me. By default the println! macro is *slow* for writing large amounts of data to stdout. It allocs a String, calls a formatter and flushes the stream (I think). Doing a raw write to the file handle with bytes is much faster. Add in something I learned a few years ago when discussing perf optimisations with Atom (https://twitter.com/hashcat/status/1137335572970790912), use an output buffer. The combination of those two makes a massive speed difference over a basic println!. Then I went down the rabbit hole and squeezed a few more milli seconds by using the write! macro instead of format! or similar to get a printable hex encoding of the resulting hash, doing it per byte instead of across multiple at once, and using extend_from_slice() to add to the buffer rather than push() or append().
That’s it for now. I hope this is interesting to someone else who enjoys going deep on performance issues, or who just needs a fast basic NT hash cracker. Next up, I want to see if I can add the GPUs to the mix … left to my own devices … this is what you get.
ntcrack is already the name of a password cracker circa 1997 (https://seclists.org/bugtraq/1997/Mar/103) that cracks LM hashes (which were used by Windows NT, hence the name). Just for kicks I got it compiled on my machine to test (you can get libdes from https://ftp.nluug.nl/security/coast/libs/libdes/libdes-4.01.tar.gz).
The release mail for v2 states:
“We ran a user list of length 1006 with a word list of around 860,000 in 5 minutes 30 seconds on a pentium 133 with 32MB RAM running Windows NT Server. Roughly 2,606,000 cracks per second..”So let’s run it on a modern M1 Pro and see how it performs …
That’s a cracking speed of … 1 977 446 H/s which is *slower* than jwilkins’ speed from 25 years ago. But the elapsed time is much faster, 5.5 mins on the pentium for an 860k wordlist, compared with 7.2 seconds for a 14 million wordlist.
Anyway, I hope he doesn’t mind me using the same name :)
]]>tl;dr
We reported a long standing PEAP bug in all Apple devices that would allow an attacker to force any Apple device (iOS, macOS or tvOS) to associate with a malicious access point, even if the authentication server (RADIUS) couldn’t prove knowledge of the password. To understand it fully, we go on a deep dive into EAP and MSCHAPv2.
While prepping for our Defcon talk last year, Michael kept pushing me to implement hostapd-wpe‘s EAP success attack. In this attack, the authentication server will accept any username, then skip the step where it proves knowledge of the password back to the station (because it doesn’t know the password), and instead sends an EAP-success message back to the station. I refused for a long time, because I thought it was a dumb attack that would never work. This is because in MSCHAPv2 the authentication server also proves knowledge of the password back to the station, and if it couldn’t, I assumed the station would just refuse to continue, after all, that’s the whole point.
Eventually, I caved and tested hostapd-wpe’s “always send EAP success” attack against a few devices, and bizarrely, my Apple devices (iPads, iPhones, Macbooks) all successfully connected to the malicious access point. Huh?
Since WPE is written by Brad Antoniewicz, I asked him if he was aware of the bug, to which he replied:
So I wrote up a bug report and sent it off to Apple. It was a weird one, because Brad did the technical work that lead to discovery of the vulnerability, plus it had been a feature in hostapd-wpe for a few years already. The disclosure timeline and original report are at the end of this post.
To understand the vulnerability, we need to know how MSCHAPv2 in PEAP works and that requires a deep dive into some concepts. I’m writing them up and releasing the toy code to validate what I’m saying, because there are no good recent writeups of how this works, and how to see it for yourself.
The first “P” in PEAP stands for “Protected” and practically that means the whole exchange is wrapped in TLS. This part is called the outer tunnel. Within that tunnel, a MSCHAPv2 challenge response happens where the station (or the client, or the peer) and the authentication server (or RADIUS or AAA) prove knowledge of an identified user’s password to each other. This is done via the AP (because most often it isn’t also the RADIUS authentication server). If you’re familiar with wifi hacking, this is the part where if you person-in-the-middle it, you get the challenge:response hash to send to JtR/hashcat/asleap.
After this, the normal WPA/2 4-way handshake occurs. But, instead of using a typical pre-shared key, it uses a key (the pairwise master key or PMK) negotiated during the outer TLS session. This means, while you can capture these handshakes, you won’t be able to crack them.
MSCHAPv2 is a challenge response protocol. The station and authenticator first identify themselves (to make sure that user is authorised). Then both share a random challenge (peer and authenticator challenge) which is combined with things like the username and password hash to prove to each other that they both know the password, without ever sending the password across the wire.
There are several RFCs that cover EAP, PEAP, CHAP, MSCHAPv1, MSCHAPv2, MPEE and MPEE key derivation. These are pretty frustrating to read as they refer to eachother, and no one document puts it all together. I did, in the code at https://github.com/sensepost/understanding-eap.
This is typically where packet captures would come in. However, the whole MSCHAPv2 exchange is encrypted by TLS. Years ago, Michal wrote a perl script to decrypt this inner session and display it in Wireshark as well as documenting what was happening in the inner tunnel. However, modern TLS isn’t so easily decrypted thanks to perfect forward secrecy, and I wanted to see how things changed when we made the mana authenticator act differently. So instead, I told wpa_supplicant and hostapd to use the openssl eNULL cipher. This provides no encryption, only authentication of the data. Which means we can see the data in the clear. This, combined with the hexdump’s provided by hostapd-mana run with debugging (-d), let me see what was happening in the inner tunnel.
You can enable eNULL in wpa_supplicant and hostapd by adding the following line to the respective config (use quotes for wpa_supplicant’s config, no quotes for hostapd’s):
openssl_ciphers="eNULL"
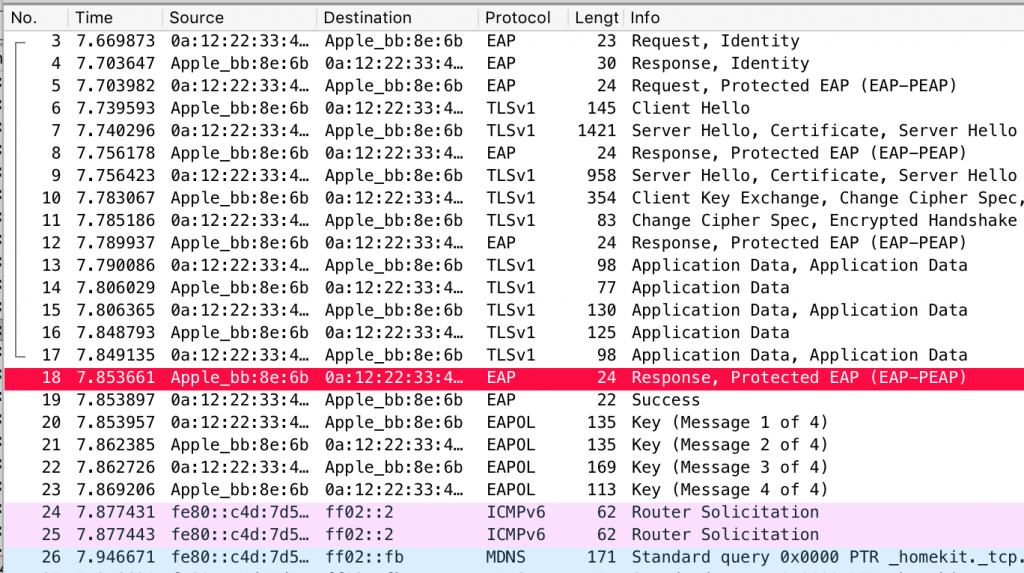
A packet capture of a successful association looks like this:
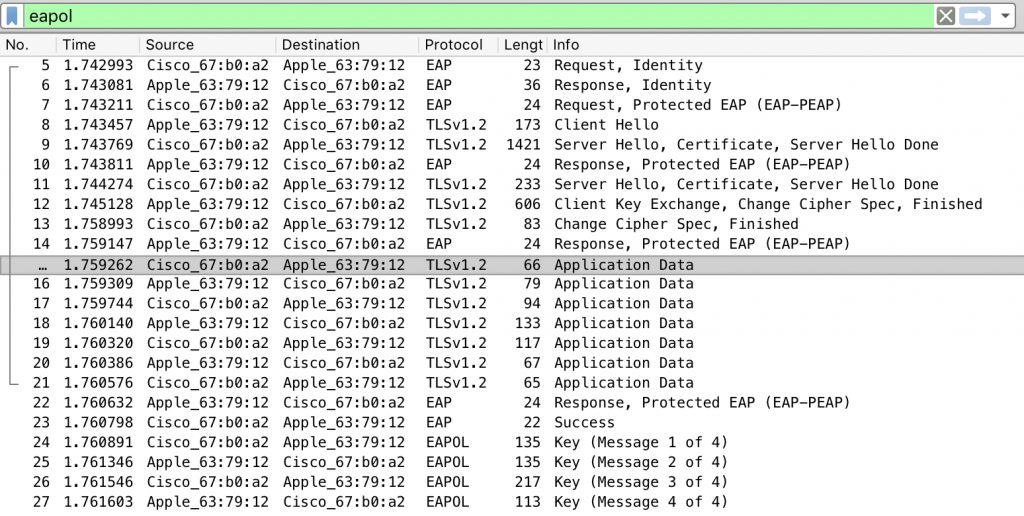
You can see the following happening:
As you can see the MSCHAPv2 exchange happens over seven frames. These are listed here, and the specific bytes described after:
If you look at the encrypted data within the first frame, wireshark helpfully “decrypts” it for you:
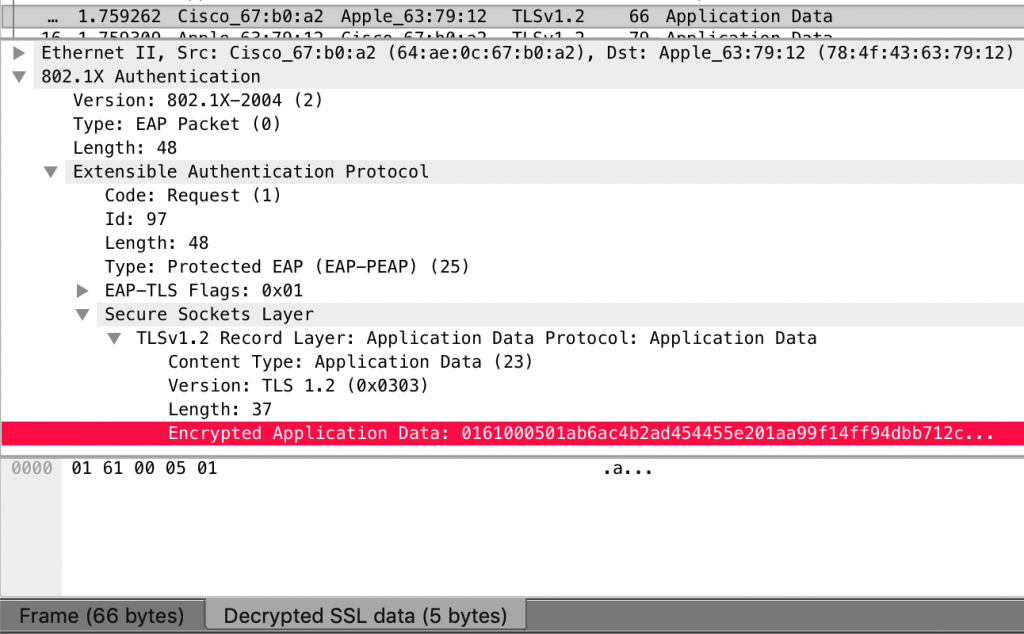
MSCHAPv2 Frame 1: Authenticator -> Station – Initiation.
This is a EAP/CHAP format, which is made up of the following. All bytes are in hex except where they conform to ASCII strings.
MSCHAPV2 Frame 2: Station -> Authentication – Username
MSCHAPV2 Frame 3: Authenticator -> Station – Authenticator Challenge
MSCHAPV2 Frame 4: Station -> Authenticator – Peer Challenge & NTResponse
MSCHAPV2 Frame 5: Authenticator -> Station – Authenticator Response
MSCHAPV2 Frame 6: Station -> Authenticator – Success
MSCHAPV2 Frame 7: Authenticator -> Station – Success
We can check the above by implementing the code described in the RFC 2759 Section 8 which you can grab from our repo at https://github.com/sensepost/understanding-eap.
The Station/Client Side
Both the authenticator and the station send each other some random data (the challenges’s). The authenticator sends its challenge first (the Authenticator Challenge), so the client gets to kick off the computations. Using the values from above and the code I just posted, it looks like this from the python3 interpreter:
from eap import MSCHAPV2
UserName = b'Oliver.Parker'
Password='123456Seven'
AuthenticatorChallenge = b''.fromhex('f5 b8 ad ee e9 ff 08 15 dd 83 e8 2d 89 6e eb 2a')
PeerChallenge = b''.fromhex('e3 32 bf 8e c5 37 e5 72 1d 0d 9a 0e e4 40 46 d6')
chap = MSCHAPV2(UserName, Password, AuthenticatorChallenge, PeerChallenge)
PasswordHash = chap.NtPasswordHash(Password)
Challenge = chap.ChallengeHash(PeerChallenge, AuthenticatorChallenge, UserName)
NTResponse = chap.ChallengeResponse(Challenge, PasswordHash)
print ('Challenge : '+Challenge.hex())
print ('NTResponse: '+NTResponse.hex())
Challenge : ada74b1fca661d15
NTResponse: 6cdadb80dd5310b805f2a0da9bb45ead51ee65344c95e600
The station then sends the NTResponse and its peer challenge to the authenticator. You can see the calculated NTResponse matches that from frame 4 above.
A WPE interlude
That challenge and response should look familiar. It’s basically the same as a NetNTLMv1 hash. However, in NetNTLMv1 the challenge is just sent over the network, in MSCHAPv2 the challenge is computed from the two challenges and the username. This is also what freeradius-wpe, hostapd-wpe and hostapd-mana give you when they PitM (Person in the Middle) a PEAP session and capture a challenge response.
We can test this is correct using asleap/hashcat/JtR, I’ll use asleap:
> asleap -C ad:a7:4b:1f:ca:66:1d:15 -R 6c:da:db:80:dd:53:10:b8:05:f2:a0:da:9b:b4:5e:ad:51:ee:65:34:4c:95:e6:00 -W passwords
asleap 2.2 - actively recover LEAP/PPTP passwords. jwright@hasborg.com
Using wordlist mode with "passwords".
hash bytes: 2b6f
NT hash: 79337ad5724e777b41e8fc81ad232b6f
password: 123456Seven
And indeed, if we check the value of PasswordHash in our python, it will match asleap’s “NT hash”.
The Authenticator/RADIUS Side
At this point, the authenticator now has the stations challenge (the peer challenge) and can do similar calculations. They look like this:
from eap import MSCHAPV2
UserName = b'Oliver.Parker'
Password='123456Seven'
AuthenticatorChallenge = b''.fromhex('f5 b8 ad ee e9 ff 08 15 dd 83 e8 2d 89 6e eb 2a')
PeerChallenge = b''.fromhex('e3 32 bf 8e c5 37 e5 72 1d 0d 9a 0e e4 40 46 d6')
chap = MSCHAPV2(UserName, Password, AuthenticatorChallenge, PeerChallenge)
NTResponse = b''.fromhex('6c da db 80 dd 53 10 b8 05 f2 a0 da 9b b4 5e ad 51 ee 65 34 4c 95 e6 00')
PasswordHash = chap.NtPasswordHash(Password)
AuthenticatorResponse = chap.GenerateAuthenticatorResponse(Password, NTResponse, PeerChallenge, AuthenticatorChallenge, UserName)
print('Authenticator Response: ' + AuthenticatorResponse)
Authenticator Response: S=3EC7654786779579D27FCB870C93670D66E5AFB7
The authenticator then sends the authenticator response to the stations, along with a success or failure code. You can see that the calculated response matches that from frame 5 above.
In the case of a normal access point and authenticator, the station would send its username, and if the authenticator has a record for that user, authentication will continue. That failure condition isn’t particularly interesting.
However, if you set up a malicious authenticator, that will accept any username, you can capture the two challenges as well as the NTResponse from the station, which you can crack as detailed above. This was what Joshua Wright and Brad Antoniewicz published in 2008 with their initial freeradius-wpe work.
Interestingly however, the exchange ends, because the authenticator ended it, not the station. It can’t validate the NTResponse from the station (because it doesn’t have the right password). So the authenticator can’t compute an Authenticator Response, and instead sends a failure response in frame 5 along the lines of:
E=691 R=0 C=00000000000000000000000000000000 V=3 M=FAILED
WPE’s EAP-Success
In the case of WPE’s -s switch, to implement the “always return EAP-Success” attack, the authenticator skips sending the authenticator response, and jumps ahead to a success frame, much like frame 7 above.
If a normal station/client/supplicant sees this, it will end the exchange, because it was expecting the authenticator response. In wpa_supplicant’s case, it will hard stop and send a deauthentication frame at the AP.
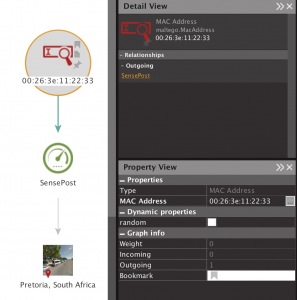
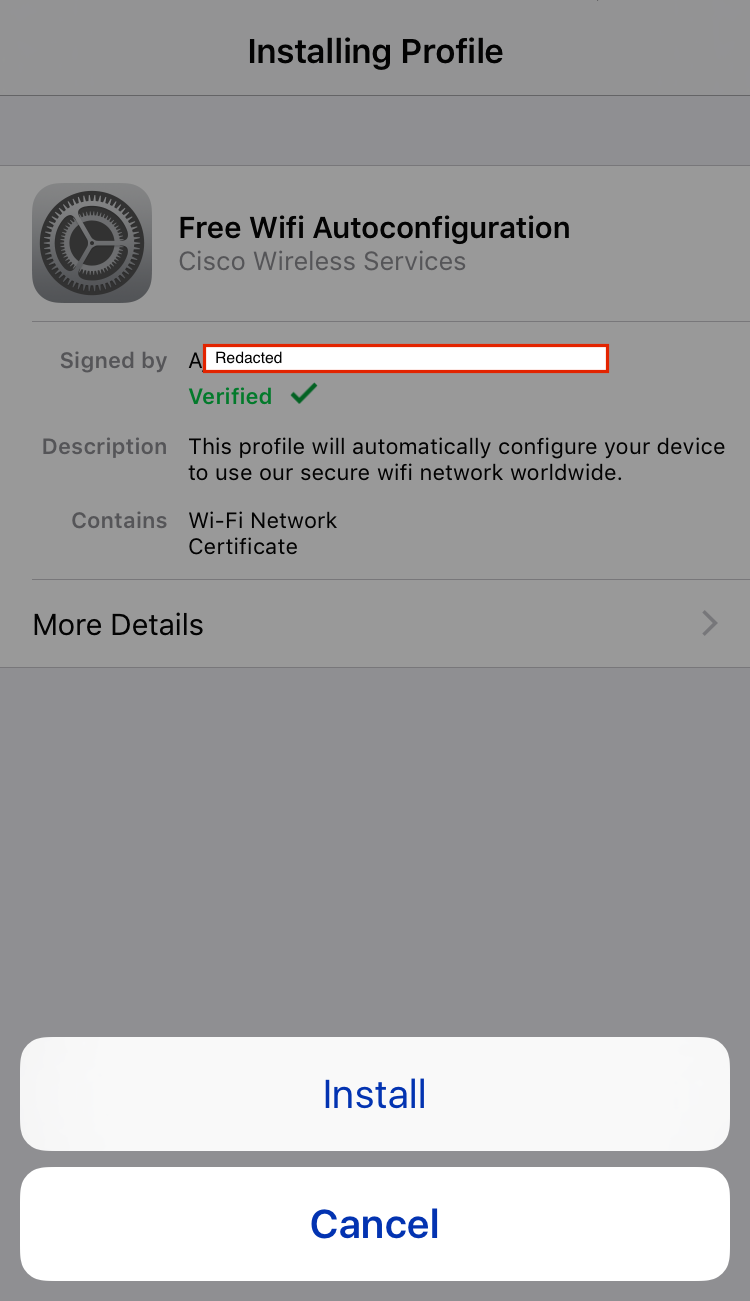
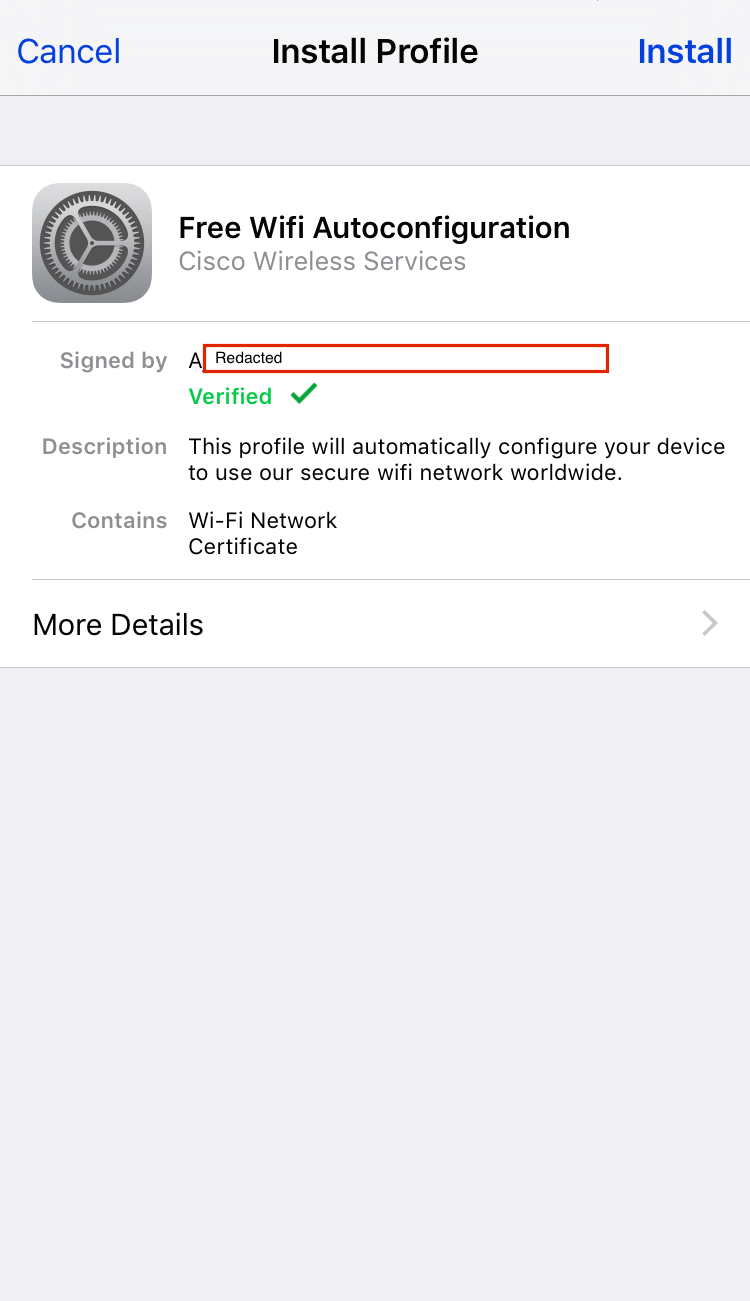
In the case of unpatched Apple devices, the authenticator would skip sending the authenticator response and just send a MSCHAPv2 success frame as per frame 7 above. A vulnerable Apple device happily jumps ahead in its state machine, accepts that, and exits out of the inner MSCHAPv2 tunnel. It then sends a PEAP response, to which hostapd-wpe sends the EAP-Success.
Earlier, when introducing PEAP, we said that by default (i.e,. if there’s no cryptobinding), the pairwise master key used for starting the WPA2 4-way handshake is taken from the outer TLS session. The authenticator sends this to the AP at this point, and the AP and Apple device happily complete the 4-way handshake and the device connects. Here’s an example:
If you’d like to read the original vulnerability report, it’s at the bottom of this post.
The Risk
This means that if an Apple device connects to a rogue AP that doesn’t know the user’s password, not only will it get the NetNTLMv1 challenge response, the device will also connect to the network. Because EAP’ed networks are typically corporate networks, the Apple device will think it’s connected to that (sans user interaction), at which point Responder style attacks are also possible.
That said, this isn’t exactly CVSS 10 territory, and we rated the initial vulnerability as a CVSS3 5.5
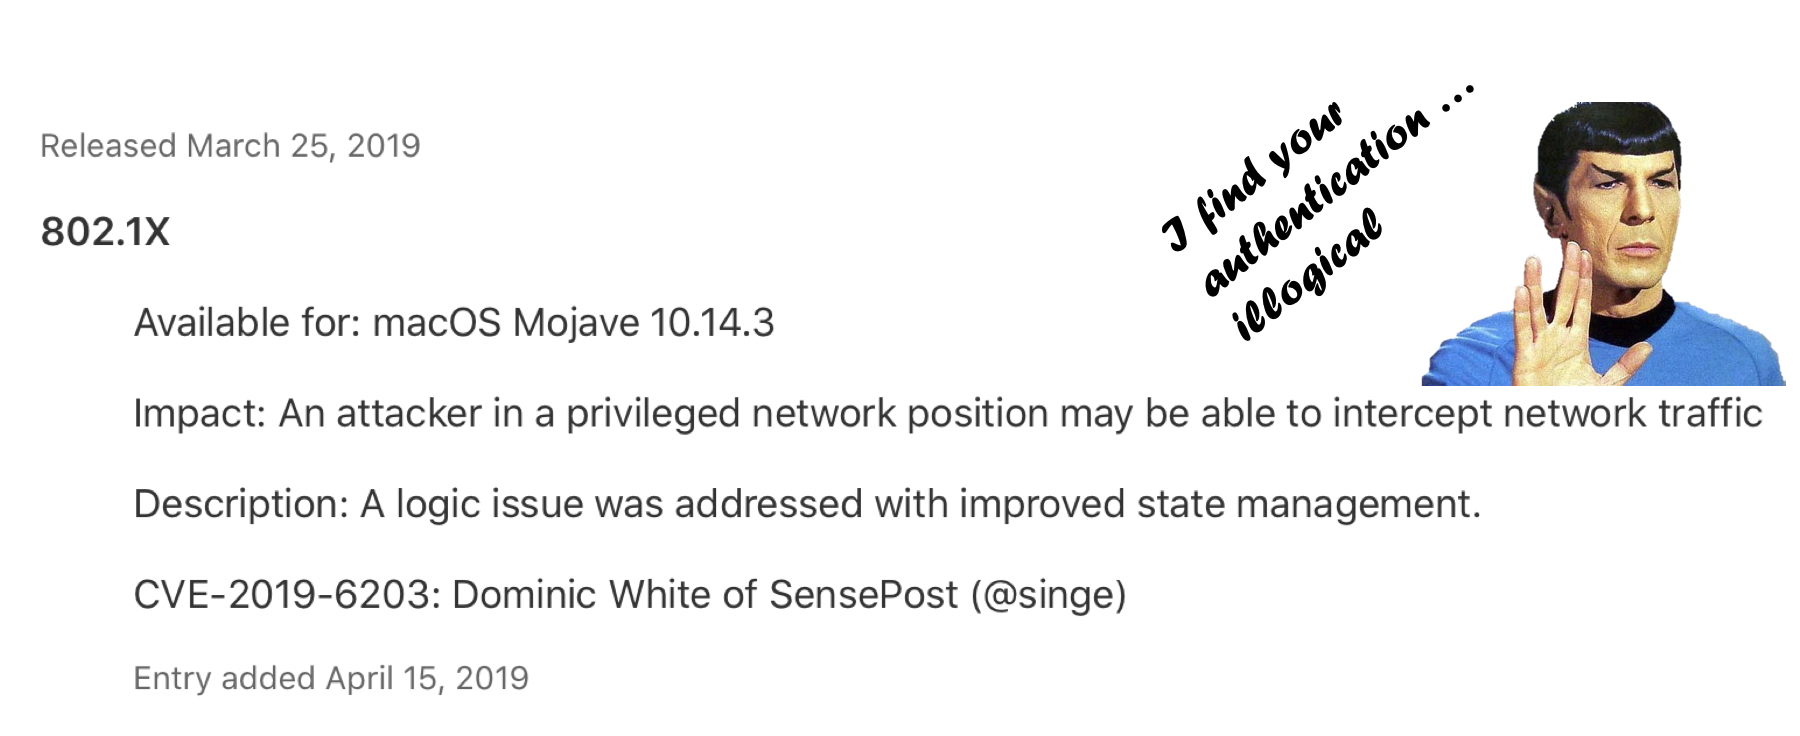
However, the vulnerability seemed to affect multiple iOS and macOS versions, as well as multiple Apple devices such as Macbooks, iPhones and iPads. Apple’s advisory confirm it also affected Apple TVs.
Apple released three updates for macOS, iOS and tvOS to fix this, and assigned it CVE-2019-6203. It took them approximately 8 months from the time of reporting to the fix. We don’t always appreciate the engineering effort that goes into fixing the vulns we fling at these teams, especially one that affects so many devices. A big thanks to anyone involved in getting it fixed.
That said, the way Apple fixed this confuses me to no end. Devices that have been patched exhibit the exact same behaviour at a PEAP, MSCHAPv2 and WPA2 level i.e. the device still connects to the network, and in some cases will even request DHCP. Here’s an example:
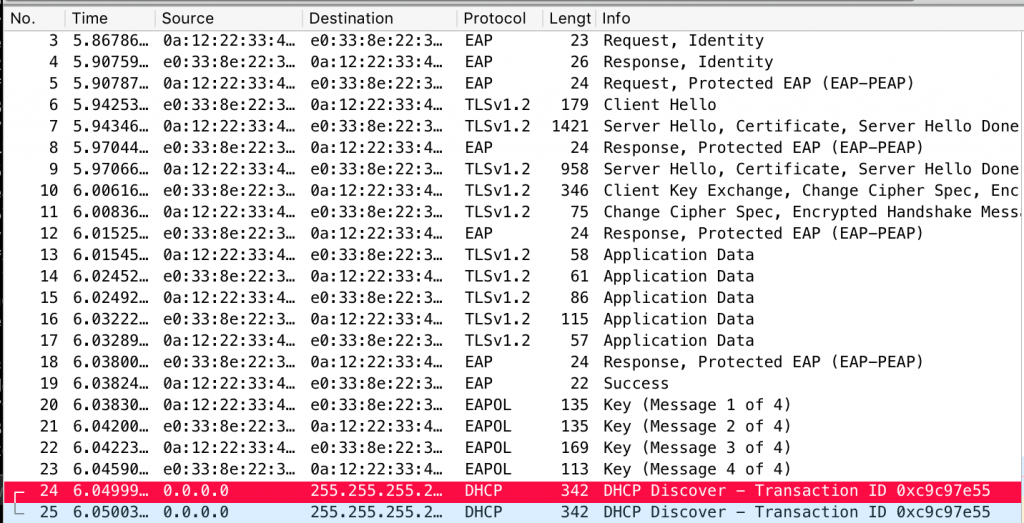
Instead, Apple made the devices disconnect from the network after connecting. The device displays a “cannot connect” error, and a log entry shows up on the device saying:
This is a little bit like a security guard letting someone in the building, then chasing them out once they’re inside. While it has the same end effect, I’d be a little worried about what could be exposed during that time. That said, different chips may be doing different things, and maybe this is a temporary fix until it can get fixed in firmware. I can only imagine it’s an engineering nightmare and wish the people dealing with it luck.
However, while testing the new fix, I did notice one outlier, when the device connected but derived a different PMK, evidenced by the MIC in the second message of the handshake. (That’s what the WPA code in the repo is for.) I haven’t been able to get it to repeat, but it should be impossible since the PMK is taken from the outer TLS session and cryptobinding wasn’t enabled. I also haven’t tested extensively across different devices. So there may be updates to my understanding of this fix later.
I’d also like to thank the anonymous Apple employee who spoke to me off the record about progress.
While it’s lovely to see my name credited to this, Brad Antoniewicz deserves most of the credit as he wrote the initial exploit, I just spotted the specifics and reported it.
iOS and macOS will connect to a malicious wifi access point using PEAP/MSCHAPv2 if an EAP-Success message is sent with an invalid authenticator MSCHAPv2 response.
Only a few versions were tested, these were:
iOS 11.4.1 (iPhone)
iOS 9.3.5 (iPad)
macOS 10.13.6 (MBP Pro 2017)
PEAP establishes an outer TLS tunnel, and typically MSCHAPv2 is used within the tunnel to authenticate a supplicant (client iOS device) to an authenticator (backend RADIUS server). With MSCHAPv2 a challenge is sent to the supplicant, the supplicant combines this challenge and their password to send a nt-response. The authenticator generates the same expected nt-response based on its knowledge of the password, and compares them. If they match, an EAP-Success frame is sent to allow the supplicant to authenticate. However, this EAP-Success frame is sent with a 42-byte message authenticator based on the authenticator’s knowledge of the password (aka authenticator response). The supplicant should validate this message authenticator.
iOS and macOS do not. This makes it possible to stand up a fake access point, that will accept any username and password, and merely send an EAP-Success back. iOS/macOS devices will then connect.
wpa_supplicant on Linux and Android, and Windows 8/10 have been tested and are not vulnerable. As they will validate the message authenticator sent from the authenticator and refuse to connect.
CVSS3 5.5
https://www.first.org/cvss/calculator/3.0#CVSS:3.0/AV:A/AC:L/PR:N/UI:R/S:U/C:L/I:L/A:L
Devices could end up connected to networks the user believes are trusted. This could allow additional MitM attacks against the device or applications running on it.
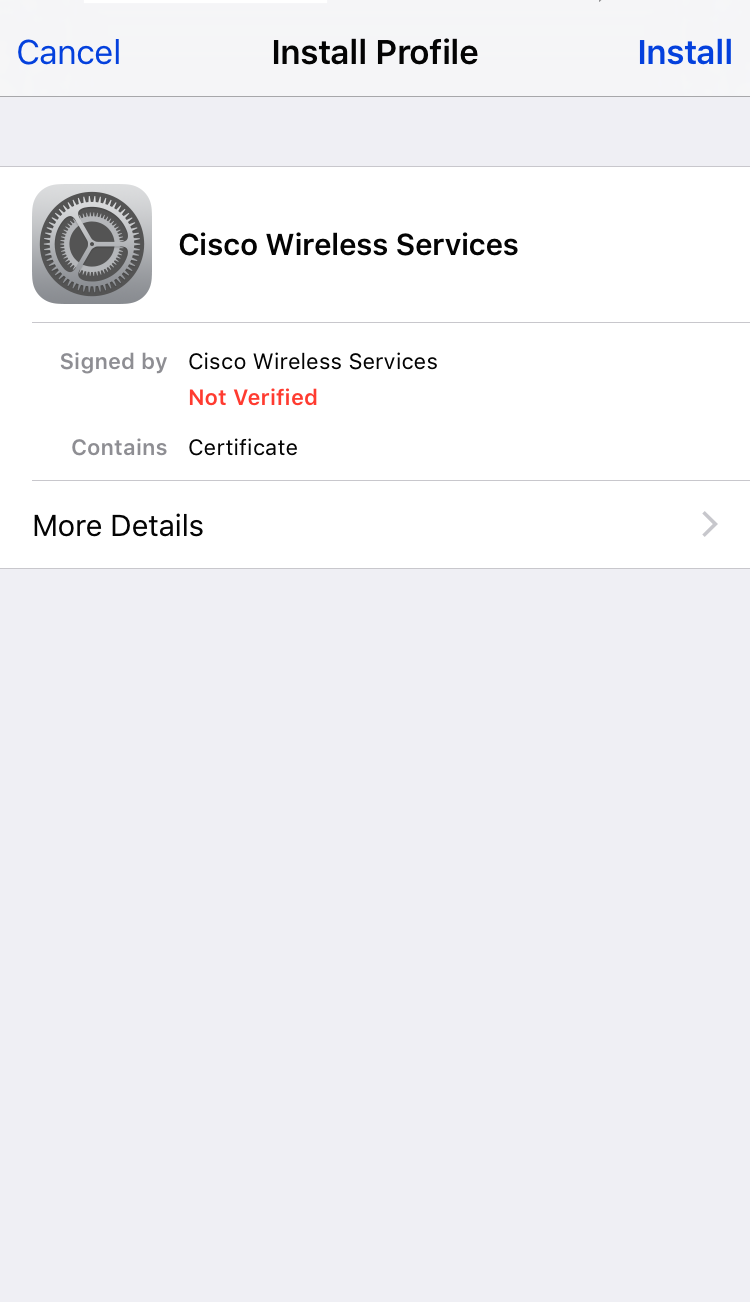
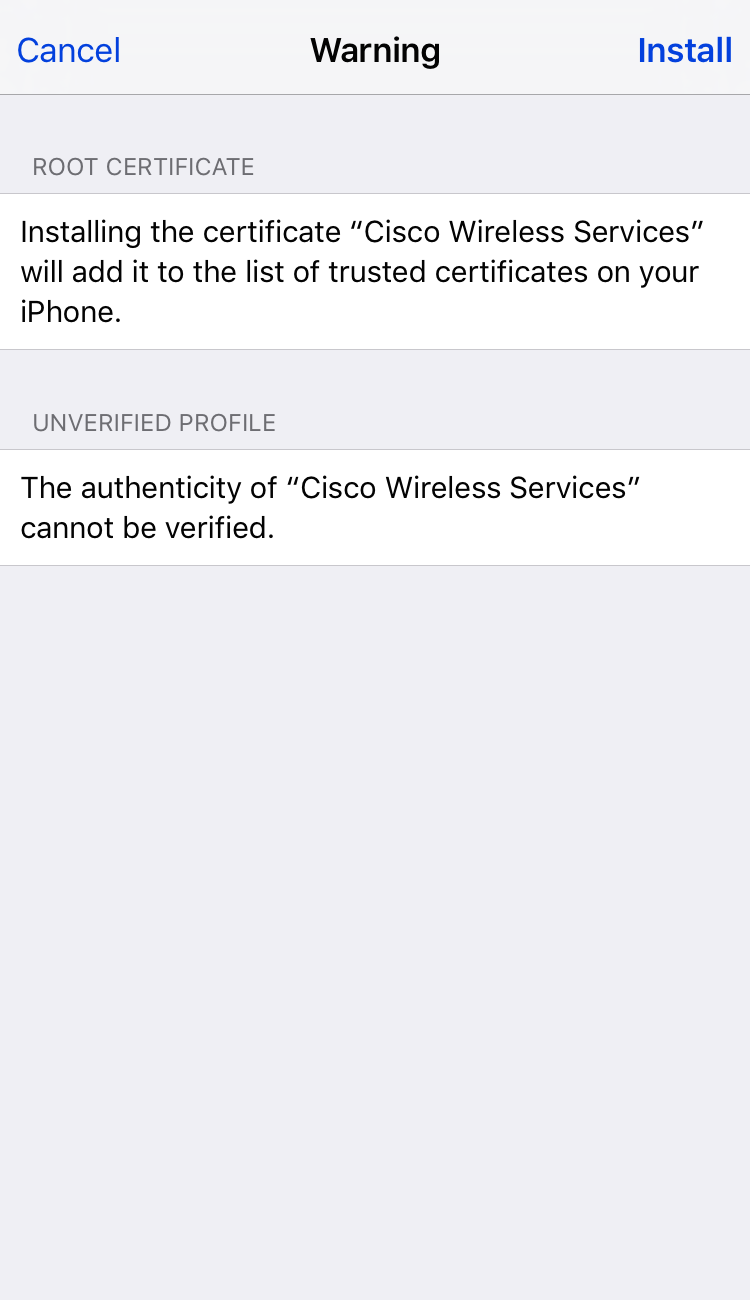
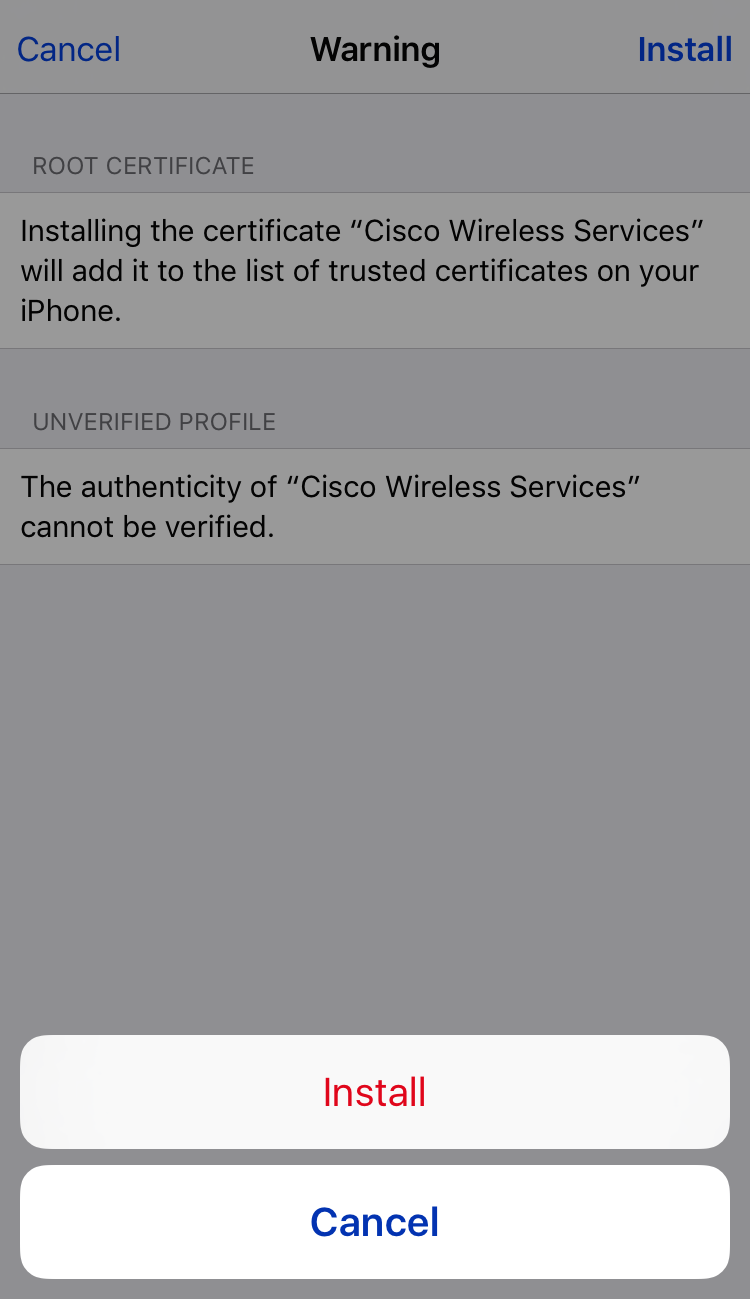
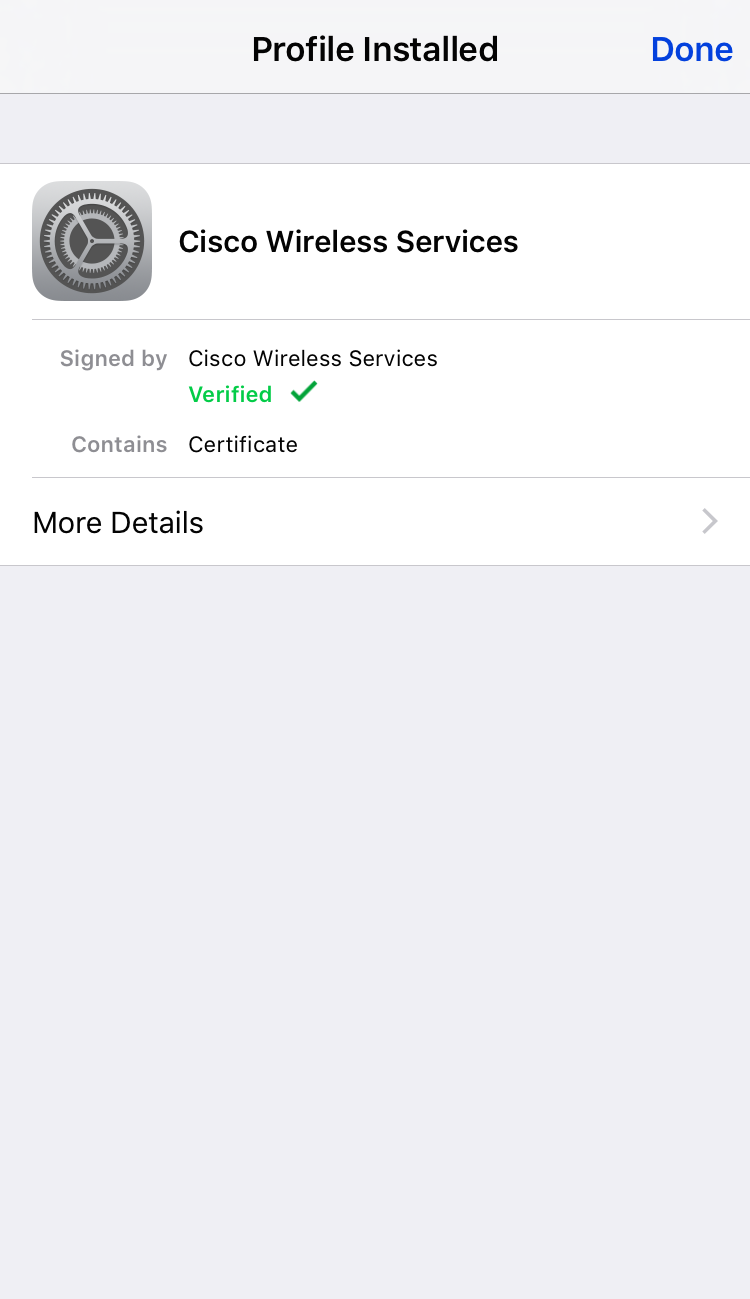
Devices connecting to PEAP networks should validate the certificate sent by the authenticator, but user’s aren’t good at validating certificates. However, iOS devices won’t automatically connect to the network if it has a different certificate, meaning users will need to manually select the network and choose to trust the new certificate. Although, cloning all aspects of the certificate with tools such as https://github.com/sensepost/apostille will make it hard for a user to differentiate a fake one from the original.
Install hostapd-wpe https://github.com/OpenSecurityResearch/hostapd-wpe/blob/master/hostapd-wpe.patch
This is most simply done in Kali with “apt-get install hostapd-wpe” and the following assumes that approach.
Run it with the -e switch to enable “EAP Success”
https://github.com/OpenSecurityResearch/hostapd-wpe/blob/master/README#L135
On an iOS device, under Wifi, connect to the “hostapd-wpe” network. Choose to trust the certificate. Any credentials can be used.
The device will connect. Running dnsmasq to hand out DHCP will show the device gets an IP.
Attempting the same client connection with wpa_supplicant using the following sample configuration will not work:
network={
ssid=”hostapd-wpe”
key_mgmt=WPA-EAP
eap=PEAP
phase2=”auth=MSCHAPV2″
identity=”test”
password=”password”
ca_cert=”/etc/hostapd-wpe/certs/ca.pem”
}
You will see the supplicant will reject the final message authenticator and disconnect.
Validate the message authenticator sent in the final EAP-Success message, and do not allow iOS/macOS device to connect to rogue access points that cannot prove knowledge of the user’s password.
An example of wpa_supplicant performing this validation can be found at:
https://w1.fi/cgit/hostap/tree/src/eap_peer/mschapv2.c#n112
Credit for the functionality I used goes to Brad Antoniewicz (@brad_anton) the author of hostapd-wpe. Although, he was not aware of the iOS/macOS specifics.
Originally published at SensePost's Blog. ]]>Essentially, WebAssembly is a way to compile stuff to a browser-native binary format .wasm, which you can then load with JavaScript and interact with.
Since this is binary, I wanted to start with a C program. Since it’s C, to avoid includes or C<->JS string handling, I’m just going to return 42 like other tutorials start with :)
int main() { return 42; }
If we compile and run it as usual:
> gcc -o 42 -O1 42.c > ./42 > echo $? 42
If we disassemble 42, we get:
push rbp mov rbp, rsp mov eax, 0x2a pop rbp ret
Right, now let’s see what it looks like as WASM. The easiest way to get started is to use an online fiddle tool such as:
https://mbebenita.github.io/WasmExplorer/
or
https://wasdk.github.io/WasmFiddle/?q1rr6
There is a human readable intermedia form wasm can be represented as (a .wat). For our 42 program this looks like:
(module (table 0 anyfunc) (memory $0 1) (export "memory" (memory $0)) (export "main" (func $main)) (func $main (; 0 ;) (result i32) (i32.const 42) ) )
If we look at WasmExplorer, it also shows the asm of the resulting binary .wasm:
sub rsp, 8 ; 0x000000 48 83 ec 08 mov eax, 0x2a ; 0x000004 b8 2a 00 00 00 nop ; 0x000009 66 90 add rsp, 8 ; 0x00000b 48 83 c4 08 ret
I’ve no idea why that nop is in there.
Online tools are nice, but what if we wanted to compile and host it oursleves?
First you need emscripten. Hopefully your OS has a nice package. On macOS the homebrew version broke badly, so I followed the manual installation instructions which were super easy.
Once you’ve got it installed, you can compile a “hello world” to wasm with:
emcc hello.c -o hello.html -s WASM=1
This will generate three files, the .wasm binary, a .js loader, and a .html emscripten front-end. Put them up on a webserver of your choice and access the .html, and you’ll see ‘hello world’ in the console. Alternativley, you can have emscripten host a webserver and run it for you with:
emrun --browser firefox --port 8080 .
Or try it at https://sensepost.github.io/wasm-demos/emscripten/hello.html
It’s nice that emscripten automates a bunch of stuff for us, like the JS, but I wanted to see what the simplest calls are. So let’s make our own. Mozilla documents this here.
The .wasm emcc compiles is rather large, so I used the .wasm from the fiddler above (click the download icon next to “Wasm”).
The simplest loader for our 42 program that I can come up with is this:
<html> <body> <script> var wasmCode = new Uint8Array([0,97,115,109,1,0,0,0,1,133,128,128,128,0,1,96,0,1,127,3,130,128,128,128,0,1,0,4,132,128,128,128,0,1,112,0,0,5,131,128,128,128,0,1,0,1,6,129,128,128,128,0,0,7,145,128,128,128,0,2,6,109,101,109,111,114,121,2,0,4,109,97,105,110,0,0,10,138,128,128,128,0,1,132,128,128,128,0,0,65,42,11]); var m = new WebAssembly.Instance(new WebAssembly.Module(wasmCode)); console.log(m.exports.main()) </script> </body> </html>
The buffer is simply a decimal representation of the .wasm file’s bytes. WebFiddle can do it for you if you change from “Text Format” to “Code Buffer” in the dropdown. You can also generate it with this horrible one liner:
out="";for x in $(xxd -ps -c1 42.wasm); do out="$out,$(( 16#$x ))"; done; echo $out|sed "s/^,\(.*\)$/var wasmCode = new Uint8Array([\1]);/"
or expanded to a script:
#!/bin/sh # Usage: ./wasm2cb.sh <filename>.wasm out="" for x in $(xxd -ps -c1 $1) do out="$out,$(( 16#$x ))" done echo $out|sed "s/^,\(.*\)$/var wasmCode = new Uint8Array([\1]);/"
Just running binaries and logging to the console isn’t very interesting. The good news is that passing parameters in and out is very simple.
Here’s the binary code I’m going to use, note that it doesn’t *need* a main():
int foo(int x) { return x+1; }
Throwing the resulting code buffer into some HTML looks like:
<html> <body> <script> function calc(num) { var wasmCode = new Uint8Array([0,97,115,109,1,0,0,0,1,134,128,128,128,0,1,96,1,127,1,127,3,130,128,128,128,0,1,0,4,132,128,128,128,0,1,112,0,0,5,131,128,128,128,0,1,0,1,6,129,128,128,128,0,0,7,144,128,128,128,0,2,6,109,101,109,111,114,121,2,0,3,102,111,111,0,0,10,141,128,128,128,0,1,135,128,128,128,0,0,32,0,65,1,106,11]); var m = new WebAssembly.Instance(new WebAssembly.Module(wasmCode)); document.getElementById('out').innerHTML = m.exports.foo(num); } </script> <input id="in" /> <button onclick="calc(document.getElementById('in').value)" >Go</button> <div id="out"></div> </body> </html>
And voila, we can now pass input to our binary and get a response.
You don’t need to use a code buffer each time, browsers provide WebAssembly.instantiateStreaming() to do it on the fly for you. Here’s the calc() function from above rewritten to call an external .wasm file with fancy Promise style code I don’t really grok:
function calc(num) { WebAssembly.instantiateStreaming(fetch('io-simple.wasm')).then(obj => obj.instance.exports.foo(num) ).then(res => document.getElementById('out').innerHTML = res ); }
Although this doesn’t work on Safari.
You can also call JavaScript functions from inside your binary! You do that with imports. For example, given the following C:
int foo(int x) { bar(x); return x+1; }
You can define a function bar() in the JavaScript and import it to the WebAssembly like this (building on from the calc() example earlier):
function calc(num) { var importObj = { env: { bar: arg => console.log('Got it: '+arg) } }; WebAssembly.instantiateStreaming(fetch('io-adv.wasm'),importObj).then(obj => obj.instance.exports.foo(num) ).then(res => document.getElementById('out').innerHTML = res ); }
The importObj dictionary’s “env” and “bar” entries were from the resulting .wat, which included the line:
(import "env" "bar" (func (;0;) (type 1)))
So I knew how to build the import.
We’re hackers, and we’re probably going to need to reverse this at some point. This article from the Flare-On challenge pointed me to the WebAssembly Binary Toolkit (wabt pronounced wabbit). It includes the wasm-objdump and wasm2wat tools. wasm2wat will convert the binary to the human readable .wat stack language and is probably the most useful dissasembly. wasm-objdump will give you much the same info, but in more of a typical disasm format. To get actual asm, IDA does some magic with SpiderMonkey that I haven’t looked into yet.
I hope this was useful to you and helped give you a hacker rather than dev intro to wasm.
]]>On a traditional Linux-based host, docker runs on the native OS and provisions and isolates containers with things like containerd and runc. Windows and MacOS don’t run Linux kernels and so you can’t run dockerd directly on the host OS. Instead, a Linux VM is used as an interstitial to run dockerd on. There’s some dark integration magic to allow things like bind volume mounts to the host OS from a container. In short, it looks like this:
You can get a proper explanation of it all from this docker blog post.
If you don’t believe me and want to connect directly to your docker host VM on MacOS, you can run this:
screen ~/Library/Containers/com.docker.docker/Data/com.docker.driver.amd64-linux/tty
You can also see the .iso it boots from at:
/Applications/Docker.app/Contents/Resources/linuxkit/docker-for-mac.iso
In line with Docker’s principle of “swappable batteries” the Moby framework includes LinuxKit for building small/secure Linux host OS’ that can run on all sorts of things like MacOS, Windows, Mainframes and more. This article has a good overview. Several months ago, Docker-CE for Mac moved away from using the boot2docker VirtualBox VM to a LinuxKit based HyperKit VM.
For our upcoming Defcon talk, I wanted to port the work we’d done on AWS to build WiFi CTF environments in the cloud, to Docker, so people can learn/practise WiFi hacking without needing hardware. This necessitates loading a kernel module mac80211_hwsim to create fake wifi devices. The LinuxKit VM doesn’t have these modules compiled, so my first failed attempt was to try and build these. You can build kernel modules for the existing LinuxKit VM by reading the documentation, and looking at these examples. One critical piece of information not included, is that you can grab the config for the running kernel from /proc/config.gz like so:
> docker run -it --rm -v /:/host -v $(pwd):/macos alpine:latest
/ # uname -a
Linux 23b3e591c4eb 4.9.93-linuxkit-aufs #1 SMP Wed Jun 6 16:55:56 UTC 2018 x86_64 Linux
/ # cp /host/proc/config.gz /macos/
/ # exit
You’ll also need the kernel source for that version, e.g.
wget https://www.kernel.org/pub/linux/kernel/v4.x/linux-4.9.93.tar.xz
But, while this will work for simple modules. This won’t work for wifi modules, as the existing LinuxKit kernel doesn’t have base support for wifi capabilities. So building the modules will get you errors like this:
can't insert 'mac80211.ko': unknown symbol in module, or unknown parameter
Ok, it looks like we’re going to need to build a whole new kernel.
Building a new kernel is relatively easy, especially if you’re familiar with building Linux kernels in general. The documentation is now clear and accurate. If you’re here for wifi, you don’t need to do this, as I’ve done it for you already.
First you need a copy of LinuxKit, then you need to work out what new kernel options you need to add, then you need to build your custom kernel.
Build your custom config.
git clone https://github.com/linuxkit/linuxkit
cd linuxkit/kerneldocker run --rm -ti -v $(pwd):/src linuxkit/kconfig
# In container
cd linux-4.9.96/
make menuconfig
####Configure the kernel the way you want, I enabled base wifi
cp .config /src/config-4.9.x-x86_64-custom
exit #Exit Container
For my purposes, I only added kernel options, so I stick those in a config-wifi file, so I can reuse them for other kernels, as these mostly haven’t changed across versions. You can now build your kernel, I’ve got the steps for that documented in the readme here. It should be a simple case of:
make EXTRA=-custom build_4.9.x-custom
This will build an image and store it in your docker image store with the tag linuxkit/kernel. You can now use this in your own LinuxKit builds. (Amusingly, this build is kernel panic’ing my vanilla docker-ce LinuxKit host right now, so there are still some bugs).
Great, we’ve got a shiny new kernel image, time to build a new LinuxKit iso. There are a bunch of examples of these in the linuxkit/examples directory. It makes sense to start with the docker-for-mac.yml. Open it up in your favourite editor, and replace the line
image: linuxkit/kernel:4.14.52
with your kernel e.g.
image: linuxkit/kernel:4.14.52-wifi-ba03a8d668eb6be981e1ff71883b5e9e26274971-amd64
Or just use my prebuilt kernel:
image: singelet/kernel:4.14.52-wifi-ba03a8d668eb6be981e1ff71883b5e9e26274971-amd64
If you want to have the kernel modules loaded automatically with modprobe, you’ll also need to add this to the .yml file:
- name: modprobe
image: linuxkit/modprobe:v0.4
command: ["modprobe", "-a", "mac80211_hwsim"]
Next up, build yourself an iso with:
linuxkit build --format iso-efi docker-for-mac.yml
If you haven’t build linuxkit, just run make in its top-level directory, and you’ll get the binary in linuxkit/bin/linuxkit.
This will create a file named docker-for-mac-wifi-efi.iso. You can use this, by stopping Docker, backing up your existing docker-ce iso and replacing it with this one, then restarting it.
mv /Applications/Docker.app/Contents/Resources/linuxkit/docker-for-mac.iso /Applications/Docker.app/Contents/Resources/linuxkit/docker-for-mac.iso.orig
cp docker-for-mac-wifi-efi.iso /Applications/Docker.app/Contents/Resources/linuxkit/docker-for-mac.iso
You can check that it boots alright by watching the console with the screen command a the top of this post.
If all went well, you should now have a docker running with your shiny new LinuxKit host, and immediately notice several problems. This is where it gets messy.
Despite Docker’s principle of swappable batteries, the LinuxKit image they build for Docker-CE for MacOS, has a image docker-ce with proprietary and non-redistributable code. This means that the docker-for-mac.yml that comes with LinuxKit, creates a LinuxKit image that:
This is primarily because of a tool called transfused that communicates with the osxfs process running on the mac. It used to be open source, but dissapeared and after some significant commit archeology, I eventually just asked:
To which the reply was:
And his suggestion was to just copy it out of the existing image, but:
Shucks. Then there’s also sendtohost, which send simple state info to the Docker taskbar agent. It appears to come from a private docker repo called pinata (according to strings inside it). There’s an older version available here. There also possibly a lot more I haven’t figured out yet.
This is why I built get-dockerce, to extract the things you need from the existing LinuxKit image while it’s running. Because I can’t redistribute them. Plus, with the regular release cycle of docker-ce this stuff is likely to change over time. All it really does is copy two files, transfused and sendtohost. Those two files are then used in the docker-fakece image you’ll need to build yourself. After which, they can be used in the modified LinuxKit docker-for-mac.yml file. I had to painstakingly figure out how to make that work with limited documentation (I think LinuxKit .yml files are Docker Cloud Stack files) and by recreating the .iso and restarting Docker each time. There was all sorts of weirdness (like scripts with background’ing, &, directives refusing to execute those), and figuring out how to pass the fuse device through. But it works.
Unfortunately, while transfused will now let you bind mount locations on the LinuxKit host, I haven’t got it working to allow bind mounts to those macOS host. If you have any ideas …
While this was an interesting dive into the innards of LinuxKit and Docker for Mac, the latter part feels like a lot of work and ugly hacks, that are mostly not redistributable, and fragile to change. Ideally, Docker will release the docker-ce image they use, containing transfused and similar publicly on Docker hub (it’s already on everyone’s machines just in a hard to access way) as well as an updated docker-for-mac.yml. Then we could just change the kernel and build a first-tier LinuxKit image. A request I made here.
Alternativley, they could add wireless options to the kernel they ship with LinuxKit, to allow wifi modules to be built. This isn’t great because it’s super specific to a wifi edge case, and doesn’t help people wanting to build custom kernels.
]]>BLUF: I put together a cracking technique, and tested it against other techniques, generating some insight into the best performing cracking techniques. Rockyou with hob064 rules won, but my technique came a close second, and had a faster crack speed. Get the script here.
You can use the technique with a list of common substrings from your own lists (sorry we can’t share ours). Or use the technique targetted specifically at a dump you’ve been going at to mine more cracks out of it.
As my eyes blurred over some boring work, I had the thought; “what if we used the most common substrings found in already cracked passwords, to crack more”. For example, if users regularly use “companyname” or “!!” in their passwords, this would pull them out.
To this end, I wrote some dirty python. It took 38 minutes to run across one list. Before optimising I thought I should try awk, which is famously good at this sort of processing.
That lead me to a kernel of an idea taken from these forums. awk is magic, if hard to understand. I’ll leave doing that as an exercise to the reader. Needless to say, this is *much* faster than my pythonic attempts.
The way to use this, is to dump all the clears you’ve cracked so far to a file, then run this over that output. It’ll output some stats like percentage and number of times it was seen (and sort by percentage). Just cut on tabs to get the substrings only. Make sure you don’t unique anything, if a dump has lots of the same password repeated, you *want* that to show up as “more common”. If you unique either the hashes or the clears, you’ll lose that.
I then used this to generate a list of common substrings specific to various password dumps, and managed to crack a whole lot more that I hadn’t cracked before. I used hashcat’s -a1 combinator attack mode with the substrings as the right most list and other password lists as the left. I’d run it twice, once with -jc (i.e. capitalise first letter) and then again without.
I then took the most common substrings (everything >= 1%) by percentage from various dumps, and combined those to form a short super list of common substrings.
It looked like it was working well, but I wanted to see how it compared to other techniques.
It’s fine to some “something worked well” but what does that actually mean? Well, stand back, I’m going to try science!
I run 88 different tests on my laptop (kept constant) trying different techniques against different sets of hashes to see what worked best. I’d clear the potfile, run the text, then make a note of the time it took, the H/s, the number of hashes cracked and the percentage of the total that constituted.
The experiments combined several things:
If you want raw results, my excel calcs are here: cracking-stats.xlsx
The overall results, were that a rules based approach with hob064 and rockyou featured in the top 4 for each password list as the most efficient, cracking on average 9,4% (ranging between 4,5%-18,2%) of the respective hash lists in 4-6s (your speed may vary). The second most effective, was using facebook firstnames with my substring list and uppercasing the first letter (i.e. -jc). This cracked on average 9,8% (ranging between 6,2-12,2%) of the passwords in the respective dumps between 7-8s. The next best technique (facebook-firstnames with best64) only averaged 3% and only did well against one password list, so it skewed its results. However, the substring attack had a significantly higher H/s on average than the rules based attack, which may give it an edge. To put this is a table:
Approach | Average % Cracked | Average time (s) | Average MH/s |
rockyou rules hob064 | 9.4% | 5s | 190.25MH/s |
fb-firstnames substrings -jc | 9.8% | 7.3s | 914.35MH/s |
I did a brief test of our private wordlists against one set of hashes. Those lists outperformed both rockyou and facebook-firstnames in effectiveness. So it makes sense to develop your own for your specific use cases. The first list with hob064 rules did 15% of the hashes in 2s, and the second list with my substrings and -jc did 13% in 2s.
I also did a quick check of a mask attack out of interest, I used facebook-firstname and -jc and it took 37s to get 6% of the passwords.
Finally, I checked what the overlap between the rules-based approach and the substring approaches was (i.e. are they finding the same passwords or different ones). This was less good, on average there was a 4.5% non-overlap between the rules and substring approaches. I suspect this has a lot to do with the wordlists.
]]>I’ve long been interested in the physics of RF, but never had a chance to play with it until recently. This post covers my experiments with the propagation of 7MHz signals; the equipment, the setup, the code, the results and the science.
My setup is at home, where I’ve got an ancient HF radio (ICOM 738), plugged in to a 20m dipole antenna on my roof and a laptop doing WSPR with the wsjt-x program for this experiment.
If you’re interested in more detail of the setup … otherwise skip this part. The antenna is borrowed from Wicus (thanks dude!) and consists of two 10m wires coming into a balun which connects to the coax (RG58) feed line. The balun effectively filters out unwanted signals that are picked up by the coax sheath (I think, still trying to grok these fully). It’s jury-rigged to what I had in the house at the time, a piece of too-thin PVC cable tied to a telescopic painter’s pole. The radio is too old to do digital modes (which WSPR is), so I’ve got a homebrew SignalLink-like device which routes sound out of the radio to a USB soundcard for input (thanks ZS6SKY). For output, wsjt-x converts the digital signal to audio which is sent via the microphone input of the radio (a proprietary 8-pin ICOM plug). There’s also a serial cable that triggers the push-to-talk (PTT) pin of the microphone input (by pulling RTS down to GND).
This is focused on 7Mhz signals, because I had to start somewhere, it’s where my antenna has the lowest SWR ratio (1:1) (aka signals are efficiently radiated via the antenna, and nothing is reflected back down again) and I need another USB to RS232 serial converter to auto-control my rig to switch frequencies while also triggering the microphone to transmit.
I’m also using the WSPR digital mode for three reasons. Firstly, I’m based in a suburban area, which means the noise floor is *terrible* (using the S-measure of signal strength my noise is sitting at a 9 with the preamp on and a 6 with it off, which is terribad!). This means I can barely hear traditional analog voice contacts through the noise. Secondly, digital modes are much less susceptible to RFI, and can encode the info more efficiently on narrower bandwidths which a DSP can pick out. Lastly, WSPR is designed to work even in really poor signal conditions.
My setup does two things. First, it monitors for signals from others and uploads these “spots” to WSPRnet. These are done in two minute windows (about 110s). WSPR is a very narrow digital mode (about 6Hz), so the radio’s output can include several at once and the software can pick out even very weak signals (that’s the point of WSPR).
Then my setup broadcasts a signal every six minutes or so. I vary the power of the transmitted signals between 2W and 10W (as I wanted to see how power affects things) but the default is 5W. Other stations monitoring for WSPR signals will report when they see me.
The WSPR signal includes some very basic information:
These get encoded into 50bits; 28 bits for callsign, 15 for locator, 7 for power level (I’m using a 6 digit grid locator so it’s more complex). I’m still learning what the signal looks like exactly. You’ll notice that it’s completely spoofable, but at the moment they just rely on an honour system not to pollute the data.
Before running this, I had tried a couple of voice contacts and hadn’t gotten much farther than PMB (about 400km away). I could sometimes barely hear a friend of mine from Cape Town (about 2000km away) thanks to the noise issue I spoke about, so I didn’t think I’d get much further than a few hundred kilometers.
When I first started running this, one afternoon two weekends ago, I thought I had messed something up. I was spotting other local ZA transmission (even one in Cape Town!) but nobody was spotting me. Then, in the early evening I suddenly got spotted by Russia and large parts of Europe (furthest contact was over 9000km). When I woke up the next morning, I saw that I had made contacts as far away as Wisconsin America (over 14 000km away), and by the next evening I managed by furthest contact at 16 941km in California!
Looking at lines of text is pretty dry. However, WSPRnet gives you a pretty map where you can see who’s seen your signal and whose signals you’ve seen. What you’ll notice is that most of the contacts (in the 40m band we’re looking at) were made between two night-side stations. Here are some example pictures:
However, I thought it would be really cool to visualise these changing over time in a video, so you could see how the day/night change affect things. I figured it would be a couple lines of code and a few minutes of work. Instead it took me about 6 hours, 231 lines of code and python and JavaScript to get it done over a few nights. The code is here if you’d like. Here’s a video of the last two days of activity from my stations, neatly showing how day/night affects the propagation.
This three pager from the American Amateur Radio League explains it better than most other references I’ve seen. Essentially, at night, the ionosphere thins, and starts reflecting 7MHz signals back to earth. This reflection can be anywhere between 2000–4000km (depending on the frequency of the signal and the state of the ionosphere at the time). The 17000km contacts are due to multiple bounces where it gets reflects back to earth, then bounces back to the ionosphere multiple times. This works particularly well over the Atlantic because the sea reflects better than say, the Sahara.
The dangerous thing about letting your company become bureaucratic is that when the smart people leave, they won't tell you that’s why.https://twitter.com/paulg/status/910519167949971456
The two fastest way to implementing a bureaucracy in my opinion are centralizing decision making and implementing process.
Centralizing decisions moves the person implementing something as far away from the person with power to change it as possible. It's why your bank teller just looks at you and says "there’s nothing I can do". It means the people on the ground with the knowledge of how best to do something are being ignored and disempowered to make good changes. You can try all sorts of things to fight that, spend time talking to the do'ers, put in a suggestion box etc. But why not just give them the power to change things and rather use intelligent oversight? If it's because you can't trust them, then you have a bigger problem, and one that won't be fixed by continuing to not trust them.
As for processes, the Netflix Culture Deck puts it well (https://jobs.netflix.com/culture). Paraphrasing badly, if you want to do something the same way every time, processify it, if you want people to keep doing it better, let exceptional people be exceptional. Process is a way of telling people "how" to do something instead of just "what to do". It encourages less thinking. Worse, if it's enforced, it disempowers people from optimizing or inventing. My suggestion, write down the objectives, why they're needed, and who can help you with them, then let smart people figure out how to go about getting those done most appropriately for the situation.
Fight organizational atrophy!
If you're interested in more on this see this post; On Large Companies and Staff Retention
]]>SP gave some talks; Charl spoke about where we’re headed in a talk entitled Love Triangles in CyberSpace; a tale about trust in 5 chapters. Chris discussed his DLL preloading work and released his toolset. Finally, Darryn & Thomas spoke about exploiting unauth’ed X sessions and released their tool XRDP, it was also their first con talk ever.
The other thing we did was run a CTF challenge off the back of the cool badge & CTF platform AndrewNoHawk and elasticninja built. This is a write up of that challenge.
The first hint that the challenge existed was on the challenge portal:
This pointed to the food tickets everyone was given to redeem for food and drink. They looked a little like this:
There were fives types of tickets. The left has what looks like a QR code. However, most QR code readers can’t read them. That’s because the colours have been inverted. This required collecting pics of all the lunch ticket codes, which in-turn required you to speak to some people, since not everyone had all the tickets. Given the low numbers, vegetarians would have been the most popular. These decode to:
left right, up up, skip BA, down down, , left right again
The oldies among us, or those using a simple Google will recognise that as parts of the Konami code. The “skip” part was due to the fact that I read badge code really badly and I thought it didn’t have a B or A button. Then later I hoped it could be used to prevent people just guessing the Konami code (i.e. you type the Konami code, you get one thing, you type the truncated one, you get another). Unfortunately, time was short.
Typing in the real, truncated Konami code; up-up-down-down-left-right-left-right, displayed a sort of riddle;
There's a wifi net you can't see. It's hidden not easy.@JP_14c
This tells you three things, the first is the next part is to do with wifi (although anyone who knows me should have guessed), the second is that it’s hidden in someway, and the third is that there’s a twitter account. The name of the Twitter account was itself a hint, but just in case it had only one tweet that directed people to this link.
In case you didn’t get it, it’s pointing to the fact that there’s a wifi network running on channel 14, a frequency only available in Japan’s regulatory domain.
I had a ton of fun setting this network up. Not only was it running in very low power and on channel 14, so most devices couldn’t see it at all, I also had it doing 802.11n which is not something that should be possible (in Japan it’s only allowed to do 802.11b (i.e. no OFDM). If you’re interested the code to comment out is here. And finally, it was running mana’s proportionality ACLs, so it wouldn’t even respond to probes from other devices. Initially, I did a bunch of editing to wpa_supplicant’s code to get it to connect, but eventually, it turned out that with the right regulatory settings it connects just fine.
However, none of that detail is really necessary, because airodump-ng in it’s default configuration spots the network just fine. The idea with the next part was to teach participants some wifi hacking.
Initially, the network ESSID was http://bit.ly/1Gm8CGe which points to the aircrack newbie guide, with tutorials on how to capture wifi traffic. The intention was to have two data requests going over the network, the first was an HTTP GET request to aircrack’s writeup of packetforge-ng. The second was a UDP packet to the badge challenge server with the string ‘1234567890’ and a varying response containing the cryptographic challenge hash. My hope was that someone would be able to grab the UDP packet, modify it to use their badge number, and re-inject it into the network spoofing the existing connected client. This could be done using three steps:
Capturing the packet can be done with airodump-ng and the -w switch to write the packets to a file. Just make sure you’re not channel hopping (-c14 would fix it) and ideally filter for just that network with the –bssid switch. The packet can be extracted using wireshark.
Modifying the packet is a three step process. The first is to use your favourite hexeditor to change the badge number from 1234567890 to your badge number. Then re-open it in wireshark, where it will inform you the checksum is wrong, and what it should be. Armed with this, re-edit the capture to change the checksum to the right value.
Re-injecting the packet can be done using aireplay-ng -3 -r <single packet capture> -h <MAC of the actual client connected> -c <BSSID of the AP> -j <injection device>. The response could be captured in the same way as the initial packet was captured.
Unfortunately, due to a bizarre string of technical failures, I was unable to replicate it on the day. Also, everybody I spoke to told me it was too advanced. So I changed the ESSID to another bit.ly link pointing to an Internet-connected, HTTP-version of the badge server. Now all that was needed was to modify the GET request with a new badge number.
Upon completing the challenge, the wifi scanner would be unlocked on the badge, allowing you to scan for wifi networks using just your badge (nice work Andrew).
At the end of the day, one person made it all the way through, Cobus Bernard. For his troubles, we gave him a R1k take-a-lot (ZA’s amazon) voucher. Well done Cobus!
]]>Snoopy’s core functionality was to observe probe requests for remembered networks from wireless clients, although it ended up doing much more.
The problem tools like Snoopy face, is that they can’t monitor the whole 2.4Ghz wireless spectrum for probe requests, without the use of multiple wireless cards. So they channel hop to make sure they see probes on multiple channels. In the 2.4Ghz range this wasn’t terrible, because the channels overlap, which means you didn’t have to tune in to all 11 or 14 (depending on location) channels individually to see probes across the spectrum. So while you may have missed a few probe requests, you didn’ t miss many.
However, with the introduction of the 5Ghz spectrum, you now have an additional 24 non-overlapping channels to monitor. This means that in order to monitor for probe requests across both 2.4Ghz and 5Ghz ranges, there is a high chance that some probes will be made while your transceiver isn’t listening to that frequency, and won’t be recorded.
Wireless clients have a similar problem. They need to quickly find nearby APs and can’t monitor the whole spectrum. Through a combination of, usually proprietary, active and passive scanning techniques, they will be “attracted” to channels with APs on and send their probes there. So we can make use of an AP and have the clients come to us, rather than us looking for them. Additionally, this is already core mana functionality, as it needs to see probe requests to know what networks to impersonate.
Additionally, to make sure we’re getting as much from the PNL (preferred networks list) of the devices we’re observing as possible, mana can also pretend to be a hidden network in it’s beacons (with ignore_broadcast_ssid=1), while still responding to probe requests. This triggers iOS devices to probe for hidden networks on their PNL but still lets you impersonate non-hidden networks.
So, I added an option to hostapd-mana that will have it log station MACs, the network they’re probing for, and whether it is a locally administered (aka random) MAC. You can enable this functionality by adding the following line to your hostapd.conf:
mana_outfile=/some/file
enable_mana=1
mana_loud=0
The last two lines are enabling mana, and disabling loud mode. This is required to track individual stations. With loud mode enabled, you’ll be limited to a single entry per SSID.
Practically, the output will look something like:
00:11:22:33:44:55, FunnyNetwork, 0
That’s a CSV of station MAC, ESSID and a 1/0 flag with 1 indicating a random MAC.
The real magic is when you import this into Maltego for visualisation. You can do this using the new “Import/Export -> Import Graph from Table” function in Maltego 4. Before doing so, make sure you have the SensePost Toolset installed from the Transform Hub on the front page, otherwise you won’t have the entities we’re about to map to.
There’s a nice tutorial when you click the Import Graph from Table button, but effectively you need to configure Column 1 as a MAC Address, Column 2 as an SSID and Column 3 as a dynamic property of the MAC Address. This looks like this picture:
Doing so, will get you a graph of which devices were probing for which networks.
Next, you can map a network name to a location using wigle.net and the “Geolocate SSID (Wigle)” transform from the SensePost Toolset. You’ll need to register for an account at wigle.net and if you’re planning on doing anything more than point lookups, you may need to contact wigle to ask for an account with less API rate limiting.
The other advantage of running mana to do this, is that you can “decloak” random MACs when the device tries to join the network. For example, here we can see three devices probing for a network, two of them are random and one is a non-random Apple device. In all likelihood, we’ve “decloaked” the random MACs by the device attempting to associate to our AP. This won’t work for Windows randomisation however.
You can grab the code now from https://github.com/sensepost/hostapd-mana I haven’t rolled it into mana-toolkit yet.
]]>And so, if we manipulate a wise man’s quote to say something we want it to say: “pentesters need to emulate real world attacks”. We’re hoping that with enough hackers equipped with these things, there will be enough “audit findings” to move the needle.
If you’re just here for the tl;dr:
We took some fairly common attacks (fake keyboards in small USB devices that type nasty things) and extended them to provide us with a bi-directional binary channel over our own wifi network to give us remote access independent of the host’s network. This gives us several improvements over traditional “Rubber Ducky” style attacks:
Lastly, we wanted this to be a working, end-to-end, attack. This means we also spent time adding some nifty features like:
Before we get into that, we wanted to acknowledge the giants whose shoulders we stood on:
* Adrian Crenshaw Plug & Pray; Malicious USB Devices & his PHUKD – Adrian did the initial work on this, and was the inspiration for the Rubber Ducky.
* Michael Ossman & Dominic Spill’s NSA Playset, TURNIPSCHOOL
Mike and Dom showed that this can be miniaturised like the NSA’s devices with some awesome work, but didn’t get to the on-host stuff.
* There are numerous projects that make use of “typing attacks” such as; HAk5’s Rubber Ducky, Samy’s USBDriveBy, Nikhil’s Kautilya or Elie Bursztein’s work (presented at BHUSA2016).
* Lastly, Seunghun Han released his Iron-HID at HITB AMS after we had submitted our Defcon CFP. It’s cool work, and a very similar idea to ours, but our implementations are very different.
We initially prototyped the attacks on April Brother’s, Cactus Micro revision 2. Think of it like a Teensy 2 with an ESP8266 stuck on it. This is still the cheapest way to get the hardware for this attack ($11).
The device has two microcontrollers, an Atmega32u4 and an ESP8266. The Atmega32u4 (hereafter AVR) gives us USB device capability using the LUFA stack. The ESP8266 (herafter ESP) is much faster than the AVR, and provides a WiFi interface, however, it doesn’t have USB support. We based our code for the ESP on the esp-link TCP-UART firmware.
However, there are a couple of disadvantages with the Cactus Micro, and we had a new board designed by Ignatius Havemann at BlackBox . It’s open hardware, and the full specs are in the code repo. We’re currently working on plans to make fully assembled versions available. Our boards make a couple of improvements:
Here’s an overview of how it all fits together.
The ESP runs a modified version of the esp-link firmware. This provides a VNC server to the attacker, which is how HID events are received. The telnet interface is used to send binary data. Originally, Rogan built a Java client and custom protocol to take HID input, but soon realised that this is what VNC was designed for, and built a VNC server into the esp-link firmware instead.
The ESP is connected via UART to the AVR. The AVR is running our own firmware built on the excellent LUFA stack. The AVR’s job is mostly to be the UART to USB interface. The AVR will present itself as three devices to the host OS. A keyboard and mouse, which are used to replay HID events from the ESP’s VNC server, and a “binary pipe” device. Currently, we’re using a Generic HID device, as it has standard drivers that don’t require privileges in Windows. Other innocuous devices, such as text-only printers or MIDI devices are planned for the future. This is also where the mouse jiggler code, to prevent screensavers from engaging, sits.
On the host, a two or three stage process is run, depending on the type of attack.
Theoretically, this attack is nothing new. However, the gap between theory and implementation was pretty big. There were some particularly face-punching issues related to developing this sort of thing on that sort of hardware we thought we should share.
Debugging embedded hardware is painful, because there is no mechanism for persistent debug logs. The ESP’s watchdog means that any lockups, or taking too long to receive/process data, ends in the ESP hard resetting, which means your debug logs disappear. We ended up snooping on the UART between the two microcontrollers with a pair of FTDI USB-UART adapters on the Cactus Micro, where we could simply clip test clips onto the .1″ headers. On our hardware, we made sure test pads are exposed to do the same. We also built a laser-cut test jig to hold the test pads firmly in place on an array of pogo pins, and utilised a Teensy LC (which has multiple hardware UART interfaces) in place of the FTDI adapters. The Teensy also has functionality to trigger the reset on the board, for fully hands off reprogramming!
When you are dealing with processors of vastly differing capability, flow control becomes a critical part of the equation.
The first place this was noticed was between the ESP and the AVR. The ESP8266 has a 128 byte output FIFO, and the AVR has a 1 byte receive register. The AVR is also much more limited in terms of RAM and CPU cycles, running at 8MHz to the ESP’s 80MHz. Even if the AVR sent a message to the ESP when it realised its own 256 byte receive ring buffer was half full, the ESP already had 128 bytes in flight in the UART FIFO. Simply making the AVR’s ring buffer larger didn’t solve the problem reliably, and we had to revert to making the ESP wait after every message it sent for the AVR to acknowledge it, and give the go-ahead for additional messages to be sent. There is definitely scope here for performance improvements!
This then triggered the second place. By default, the esp-link expects to be able to transmit all the data received via TCP to the UART in a single method invocation. However, by introducing flow control from the AVR, this could end up taking significant time, enough to trigger the ESP8266 watchdog! As a result, it was necessary to save the data received from the TCP connection to a local buffer on the ESP, so that it could be transmitted as and when the AVR was ready to receive it. This then required implementation of a periodic task that checked to see if the AVR was “receptive”, and then transmitted the next message from the local buffer.
Unfortunately, the act of returning from the “receive TCP data” method allows the TCP sender to transmit more data! If left uncontrolled, the sender would overwhelm the ESP as well. This made it necessary to add TCP flow control, using espconn_recv_hold and espconn_recv_unhold calls. It also necessitated allocation of a 5 packet buffer per connection on the ESP, as TCP can have several packets “in flight” simultaneously, that the ESP is obliged to accept.
Finally, the victim may want to transmit data faster than the AVR can send it to the ESP. For the Generic HID interface, this was achieved by setting a flag in a “control byte”, indicating that the AVR could not receive any more data, and that the sender should pause.
All this makes you appreciate the problems long solved by the folks that gave us the IP protocol, and those that have implemented it since then, that we no longer have to solve when working with high-level applications! Unfortunately, when working low-level, we relearn the problems of old!
Following various code examples found scattered around the internet resulted in use of a device file name looking like “\??\HID\VID_03EB&PID_2066&MI_00&Col01\9&32bfc41&0&0000\{4d1e55b2-f16f-11cf-88cb-001111000030}”. This worked fine on Windows 7, but failed on Windows XP. Windows devs will likely be slapping their heads, but it took searching through the XP registry to realise that the correct device prefix should be “\\?\”, not “\??\”. Funny that the latter worked on Windows 7, though!
If you check the powershell, you’ll notice a couple of .Replace() and char[] calls, which may look weird in a payload that needs to be as lean as possible to be typed fast. This is due to differences between international keyboard layouts that we ran into, resulting in different output for the same keycode. The obvious solutions would be to use powershell.exe’s -Encrypted flag and just base64 it, but given powershell expects double width base64, it doubles the size of the typed payload. An alternative might be to use a keyboard mapping in either the VNC client or the VNC server, but that makes the payload less generic, and assumes that the attacker is aware of the keyboard layout of the victim.
Using Generic HID interfaces for the binay pipe works fine on Windows, but will fail on Linux or OS X, as unprivileged users are not granted access to the device by default, as they are on Windows. An alternative implementation would be required for these operating systems.
Possible devices yet to be properly investigated include:
Wow, thanks for making it this far, we were certain you’d drop off by flow control. The code is up at https://github.com/sensepost/USaBUSe if you’re looking to grab a copy. The release has pre-compiled binary firmware you can just flash by following the instruction in the README. If you’d like to build your own firmware, we warn you that setting up the tool chain requires some patience. We’ve added some documentation to the project, and the sub-projects have a fair bit too.
As always, everything has ben released and is under an open source license. This includes the hardware designs.
]]>In our 2014 Defcon talk where we released the mana toolkit, we pointed out how stupidly easy it was to get a root CA installed on both iOS and Android devices with no hacking required. Two years later, not much has changed in the iOS world, except for a single extra unclear prompt.
To prompt a user to install a malicious root CA on an iOS device, all you need do is serve a self-signed certificate via HTTP (it has to be self-signed, otherwise it won’t install as a root CA). You just need to serve the file, you don’t even need the right mime-type. In my world, this is most easily done during the captive portal check (made up of two requests to http://captive.apple.com/hotspot-detect.html) when a device first connects to a wifi network, with the bonus being it’s done via the WebSheet and pops up over the user interface. To make things a little more tempting, you can name it something like “Free Wifi Autoconfiguration”. If the user has no pass{code|word} setup (our most likely target group) then the flow looks like this:
1 The prompt to install the self-signed malicious certificate. The red “Not Verified” is the closest sign of danger a non-technical user will see.
1.1 What you see on clicking “More Details”
2 The new warning about how it will be added to your trusted certificate store. You’ll notice, that for the average user, this doesn’t say “why” this is bad. Ideally, something like “This will allow someone to intercept and modify much of your encrypted communication.” should be added.
Even to a technical user, it doesn’t make it clear this is being added as a new trusted root, it just says something about it being trusted.
We also see a warning about the profile being unverified, which we’ll make go away later in this post.
3 The second “Install” prompt. If the user has a passcode or password enabled, they will be prompted for it before this prompt.
4 The certificate is now installed.
That’s a simple 3 step process to the user, and other than some text saying “not verified” it doesn’t really give the user any idea that something bad just happened. At this point, encrypted MitM attacks are feasible, all for the cost of serving a single cert file.
But, let’s take it one step further and see if we can get rid of that red “Not Verified” warning and maybe do a bit more than just add a root CA. In steps Apple’s Configuration Profiles.
First, we put together a simple configuration profile using Apple Configurator 2 or older iPhone Configuration Utility. Both of these generate a simple plist file. In this configuration, I add the same self-signed certificate as a credential and export the configuration to a .mobileprofile, making sure to leave it unsigned and unencrypted. Next, I sign the file using a valid code signing certificate with openssl (as detailed here). Make sure you include the full certificate chain, as the device won’t download and follow the chain itself. Just to show the profile doing something else, I add a hidden network that devices will probe for (and get responded to by mana). Finally, we update our captive portal to serve the .mobileprofile file instead of the certificate. Again, you just serve it, no fancy headers or mime-types required. This is what a user sees.
1 What a user is prompted with on connection. Gone is the red “Not Verified” now replaced by a green “Verified” resplendent with a tick due to the profile having been signed , even though it contains a malicious, unverified, root CA. We also get to add some explanatory text to make the user feel more comfortable.
I’ve redacted the signing certificate’s details because I don’t want someone getting it revoked :)
1.1 What you’d see after clicking “More Details”. You’ll notice the wifi-network in included here.
2 The same warning as before about how a certificate will be added to your trusted root store, but gone is the “This profile is unverified” warning. Again, to a non-technical user, this really doesn’t sound scary. To technical users they may even still be fooled since it doesn’t mention that it will be added as a trusted root CA.
3 The second install prompt. Again, if you have a passcode you’d be prompted to enter that before this.
4 Voila, the profile is installed, and you can MitM away.
Now, this is a malicious profile that’s been installed. You can configure nearly every aspect of an iOS device with a configuration profile, even going so far as to set up a remote MDM server for pushing new profiles down later, as well as doing things like preventing a user from removing it. Of course, additional configs come with additional warnings.
I hope this has demonstrated how easy it can be to push a malicious root CA to an iOS device, making it as a pre-requirement for the iMessage and other such attacks not an implausibly difficult one. For the level of compromise it provides, particularly in the case of a configuration profile, the “overhead” on the attacker is ridiculously low.
Additionally, I really wish Apple would make it clearer to the user what’s going on by explaining what the implication of their choice is, in big red obvious writing as well as encouraging a secure default choice. For example, when doing the same to an Android device, Google introduced a persistent warning in the notifications telling the user that their communications may being intercepted. Of course, none of this will prevent all users from clicking through warnings, but the mobile OS’es need to be following the lead of the browsers, and encouraging users to make good security choices “by default” (think of the big red “this site is insecure” warnings you get for an invalid cert these days) rather than relying on them to make good choices despite the OS’ encouragement.
I’ve not really been charitable to the interpretation of “requires a root CA”, but it was really just the hook that got me to write this entry. Apple’s fix to the iMessage flaw was to implement certificate pinning on some iMessage requests. This was done around December 2015 according to the Johns Hopkins’ paper. Certificate pinning effectively blocks a MitM of iMessage traffic, by forcing either a specific trust chain or specific certificate to be used. Our malicious certificate will not be part of that chain, nor will the certs we sign with it match the specific cert. That’s why apps such as Twitter and Facebook are also not vulnerable to MitM from this. However, older iOS’ (pre-9) are still vulnerable to this according to the JHU paper. Thus, people claiming this attack requires a root CA’s private key are correct only insofar as they mean on iOS9, which doesn’t make them wrong. The attack against iMessage is much harder than “any root CA” because you’d need to access to a specific, built-in root CA’s private key, or one of Apple’s. In short, the technique described above, will not let you perform the JHU attack against iMessages on updated phones.
]]>The functionality is exactly the same (although the probe response is a little more aggressive), and you can grab either the patch or the full tarball here:
]]>